Quantcast
Channel: Paracord guild
Viewing all 149 articles
Browse latest View live

Paracord camera neck strap

$
0
0

This time I made a paracord camera strap.

While there are a ton of different designs you can make for a camera strap, this one really appeals to me. It can be worn around the neck, shoulder or even around the hand. It includes a flat section around the neck area, designed for comfort and round areas designed for a visual appeal.

Camera strap in use.

Camera strap in use.

This design was inspired by a binocular strap featured in Des Pawson’s knot craft and rope mats. Naturally, several modifications were needed to translate the tying to paracord. All in all, I love how it turned out. It is affordable, decorative and custom made. Naturally you can modify this design further with different knots, techniques and colors, all to make it even more unique to your tying style.

With that said, below you will find a brief summary of the supplies needed, the tying process explained and a video tutorial to demonstrate all the techniques used. Most of the strap is made using classic braids and sinnets such as the square knot sinnet and the 4 strand round braid. The only challenging part of this project should be the transitional and finishing knots (diamond and manrope knot).

Supplies

The following items are needed for making the camera strap:

  • paracord 550. 2 strands, each 11 feet long (3.3 meters).
  • paracord 550. 2 strands, each 6.5 feet long (2 meters).
  • 2 key rings for attaching your strap to the camera. Naturally, other attachment options are available. Snap hooks, carabiners and many more.
  • scissors and a lighter for cutting and melting your paracord.

So, we are using basic items you should have little issue sourcing. Now, on to the description of the tying process!

paracord-camera-neck-strap-yellow

Tying the camera neck strap

The camera strap is started by taking our 4 pieces of paracord. We line them up with the two shorter, 6.5 foot long strands in the middle and the two longer, 11 foot strands on the outside, one on each side.

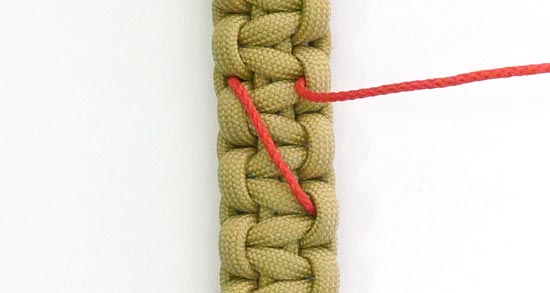
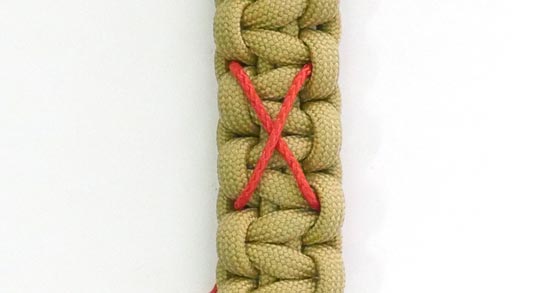
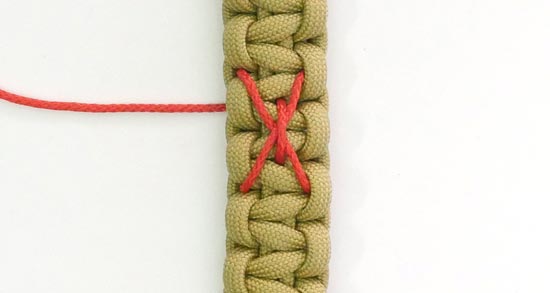
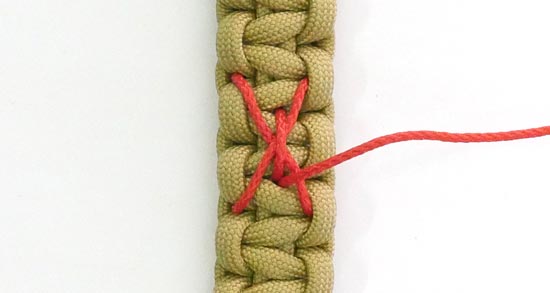
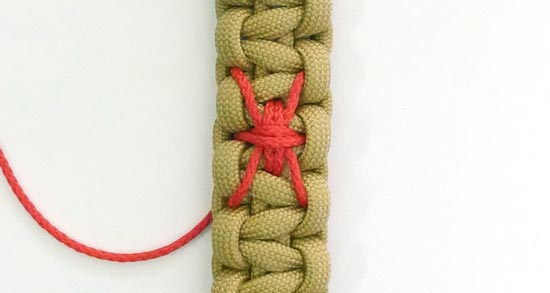
We tie the strands together at the middle point of the four strands. For this task I use a piece of thread and tie a reef knot.

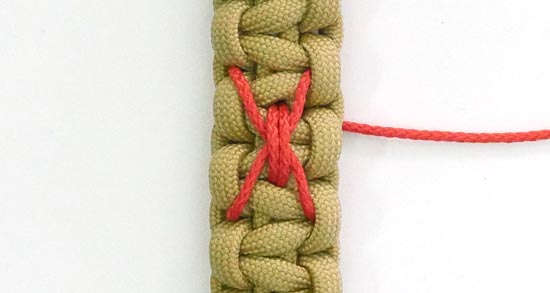
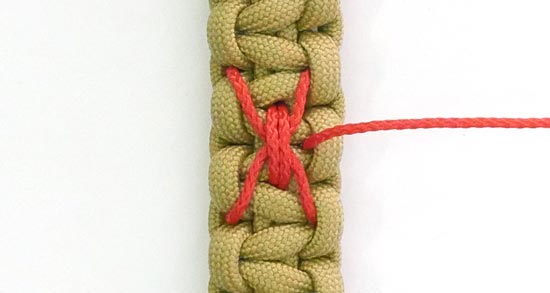
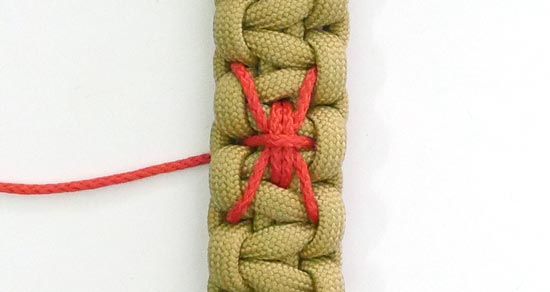
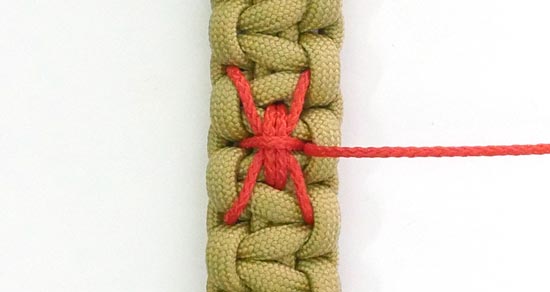
Then, using the longer two strands we start tying square knots (cobra knots) from the middle onto one side. Then, the other side is done exactly the same way. We keep lining up square knots until all strands on each side are of equal length. This produces about half a foot (15 cm) of square knots on each side of the middle point.

Then we tie a diamond knot and double it up- I double it up on the inside.

Now we continue by braiding the 4 stranded round braid on each side. We braid about 10 inches (25 cm) on each side.

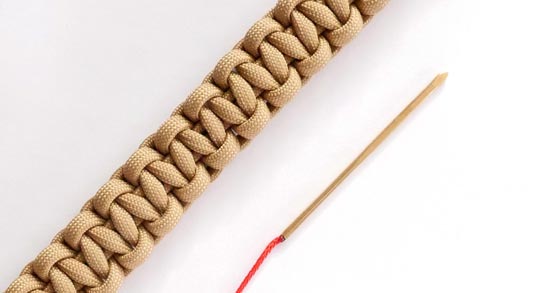
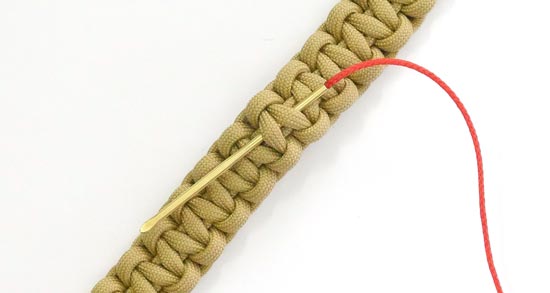
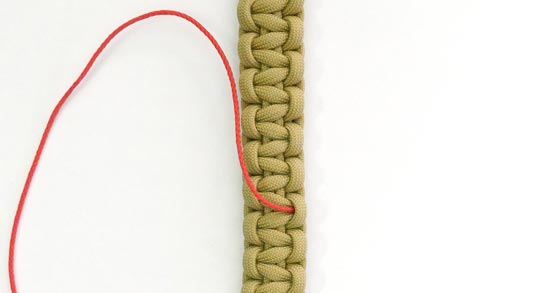
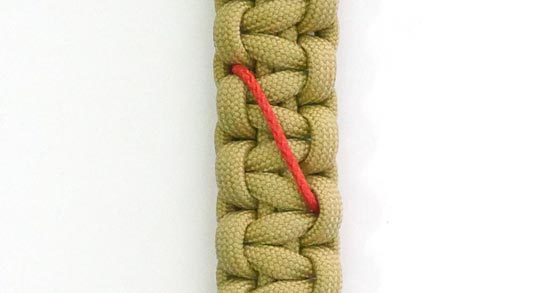
With the remaining ends on each side, we tie a manrope knot. During the tying process for the manrope knot, I form a loop with one of the strands, which is going to be used for the key ring. This is best seen in the video below, since it is a bit tricky!

Once both sides are complete, cut and melt the ends as close to the knots as possible. Finally attach the two key rings.

And that’s the paracord neck strap. Useful for cameras, binoculars and other items you would like to carry around the neck or shoulder.

Enjoy your brand new and unique strap!

The video below should prove most informative:

The post Paracord camera neck strap appeared first on Paracord guild.


Paracord get back whip

$
0
0

In this tutorial I show you how to make a paracord get back whip.

This project is one that really shines when it comes to work with paracord. The get back whip is durable, colorful and unique.

So first, what is a get back whip? The get back whip is placed onto the clutch or brake lever and hangs freely. Usually two are used, one on each side. When riding the bike it then flies through the air.

get-back-whip-paracord

While it has many uses, there is quite a debate on the original use for a get back whip. Is it a decorative item or a weapon? Let’s see what you can use it for:

  • the get back whip displays the club colors
  • it gives the bike an unique look when ridden
  • since the whip flies through the air it can make the bike easier to spot, which is a nice safety benefit
  • you can use it to maintain distance with cars, giving them a tap if they endanger you
  • it can be used in self defense

Many benefits of the get back whip are completely legitimate. But still, when using one, it is prudent to check the local laws. Different states and countries have different classifications for what makes a weapon. And you probably don’t want any attention from police on this matter.

As far as I am concerned though, the get back whip is an excellent decorative item, one that many a rider will be proud to use. It takes skill to make and it catches the eye when made properly. Honestly, I don’t like anyone telling me what is a weapon and what is not- not the law, not anyone. A lock in a sock is just as effective for violence, so why would anyone spend hours making a decorative item to fight with it recklessly? Anywho, let’s focus on the craft of making one, not on the politics of the day.

In this post I will describe the supplies and the making process for such a whip. At the end you will find a full video showing you how to make one from start to finish. This should get you through the entire process, provided you have the patience to keep going! I wish you success. Keep your eyes on the prize when the going gets tough!

get-back-whip-paracord-blue-redget-back-whip-paracord-green-yellow

Sizing the get back whip

The first thing you will want to know when making a get back whip is how long should it be. This is usually stated before the project. Still, sizing a get back whip basically means making it functional. It should not be too long to touch the ground or to hit any parts of the bike. It should also not be too short to look silly. So what are some common lengths?

  • 2 feet (short get back whip)
  • 3 feet (medium get back whip)
  • 4 feet (long get back whip)

As mentioned though, you will probably end up making either a standard length or something custom, in both cases you will know the length you want.

In our case we are going to make a 2 foot long get back whip, so a fairly short one. To make it longer, simply use more cordage in your two main cords.

In the 2 foot long get back whip, the length of the whip breaks down like this:

  • 3 inches are used up by the pineapple knot (the ball)
  • 4 inches are used up by the panic snap (the quick release mechanism)
  • the rest, so 17 inches are made with crown knots (when making a longer get back whip you will simply make more of these)

Now, let’s take a look at the supplies needed for making a get back whip!

The supplies

The items needed to make a get back whip are fairly simple, but still at least some take a bit of effort to find.

  • paracord 550. You will need 2 cords, each 27 feet long for a 2 foot whip. For a longer whip, these need to be even longer. A very rough estimate would be 10 additional feet of cord in each of your two main strands for one additional foot of crown knots.
  • paracord 550. Another 2 cords are used to tie the decorative knot next to the pineapple knot. This is optional, but I like it. These cords should be 3.5 feet long, each.
  • panic snap. These are quick release panic snaps which make removing the get back whip easy. The ones I use are 4 inches long. They can be found online, as well as in some horse related shops such as a saddlery.
  • Pringles can, a jar, can, PVC pipe or anything else you can use as a tying tool. It should be about 3 inches in diameter. We are going to tie the pineapple knot onto this makeshift mandrel and then transfer it onto the core.
  • a rubber band. A simple rubber band is used to hold one end of our cord when we are tying the pineapple knot.
  • pool ball is used as the core of the pineapple knot. It is 2 1/4 inch in diameter. Often buying a set is more affordable then buying one or two pieces individually.
  • a lacing needle makes tying decorative knots a lot easier. I absolutely recommend using one. You can also make it yourself.
  • scissors and a lighter are the final two items. Standard tools for cutting and melting paracord.

So a few supplies will need to be gathered before we can begin making our whip. Now a brief description of the making process.

Making a paracord get back whip

To begin we take our mandrel (about 3 inches in diameter) and place our rubber band around it. We are then going to take one of our long pieces of paracord (in my case 27 feet long, each) and tuck it under the rubber band. We want about 12 feet of cord in our working end, with the rest tucked under the rubber band. We are going to use this cord to tie a 11L10B turk’s head- our base knot. The second cord, again another long one (27 feet) is used to add a pineapple interweave (the standard type 1, 2 pass) to the base knot.

Then, the working ends are worked to the middle of the knot so we can begin our crown knots. Now transfer your pineapple knot off of your mandrel and onto our pool ball.

Tighten the pineapple knot around the pool ball. The goal here is not only to tighten up the knot, but also to make sure the 4 working ends end up of the same length.

Then begin a series of crown knots, forming a crown sinnet. We are going to make about 17 inches of crown knots. Together with the pineapple knot, this should bring the total length of the whip to 20 inches.

The final 4 inches are added to the whip by attaching the panic snap. This is done using crown knots.

Finally, a decorative knot in the gaucho style is added at the snap end to secure the ends. The ends are tucked under the knot, the knot is tightened up and the ends cut. Melt the ends and you are done.

On the side where the pineapple knot is, another gaucho style, 4 stranded knot is added. We take two, 3.5 foot long strands and feed them through the crown sinnet to get 4 working ends. Tie the knot, tuck the ends under the knot, tighten the knot and cut and melt the ends.

Finally, the two decorative knots can be rolled in between two planks to make the decorative knots look nicer and more consistent.

Quite a task right! To not leave you in the dark, here is a full video tutorial. Enjoy and take it a step at a time, it is a proper project!

The post Paracord get back whip appeared first on Paracord guild.

Spider stitch

$
0
0

In this tutorial I show you the spider stitch.
This simple stitch is a nice way of decorating a paracord bracelet. It is simple, quick and uses very little cord to do.

I saw this stitch made by Jordan Frazier and had to give it a go. It turned out well and I think quite a few of you can see how to do it by just looking at a few images of the end product. Still, a full tutorial is available below. This stitch can be built upon and modified if you want to play around more.

spider stitch

So, let’s first see what you need.

Supplies

  • a cobra knot bracelet. This is the bracelet we are going to stitch.
  • micro cord. 1 foot (30 cm) of cord is enough.
  • lacing needle comes in handy to guide your cord through the bracelet.
  • scissors and a lighter are used to cut and melt our cord.
spider-stitch-second

The tutorial

After tying a cobra knot bracelet we attach our piece of micro cord onto the lacing needle.

spider-stitch-1

Basic setup before stitching. Bracelet, cord and lacing needle.

spider-stitch-2

We begin on the underside of the bracelet. We bury our cord under a few sections.

spider-stitch-3

The cord on the underside, secured under a few cords.

spider-stitch-4

Bring the cord to the top of the bracelet through a cobra knot.

spider-stitch-5

Pass to the other side, in between two cobra knots.

spider-stitch-6

Travel under the bracelet through the cobra knot on the other side.

spider-stitch-7

Then travel to the other side in between two cobra knots, creating an X.

spider-stitch-8

Come up in between the two strands of the core.

spider-stitch-9

Cross over the X and back down through the two strands of the core.

spider-stitch-10

And back up through the two core strands below the X.

spider-stitch-11

Over the X for a second time passing through the two core strands. This doubles up the first strand and creates the body of the spider.

spider-stitch-12

Come up on the side of the spider through the cobra knot.

spider-stitch-13

Across the body and back down, in between two cobra knots.

spider-stitch-14

And back up, through a cobra knot on the other side.

spider-stitch-15

Across the body for a second time and through, in between two cobra knots.

spider-stitch-16

On the bottom again bury the end under a few sections to secure it. Cut and melt the end and you are done!

Enjoy your new, spider themed bracelet!
You can also see the stitch being made in the video below:

The post Spider stitch appeared first on Paracord guild.

Paracord camp chair

$
0
0

This time we are making a paracord camp chair!If you need a comfortable, simple chair for use when camping, bushcrafting, fishing, carving or even just relaxing in the backyard, then this chair is a good fit for you.
The chair can be made out of a few poles, sticks and some paracord. The tools needed don’t have to be fancy either. A knife and a saw/axe will do the job. Naturally, having a drill, a chain saw or power tools makes things a lot easier.

paracord camp stool

This style of a camp chair is also called a camp stool. The design for this one comes out of Rope Works Plus, a book by Gerald L. Findley. I had to adapt a few things to make it work with paracord and it turned out great! It is comfortable, looks great and it really invites you to sit on it :).

In the article below you will find the supplies needed, a description of the making process and at the end, a video tutorial covering the entire process.

So, let’s begin!

Supplies

These are the major supplies you will need to make the camp chair:

  • 3 poles for the frame of the chair. These are 2 feet long each (60 cm) and about 2 inches wide (5 cm).
  • 1 piece of paracord 550 for lashing the poles together. I recommend this piece is 15 feet long (4.5 meters).
  • 3 pieces of paracord, each 7 feet long (2.1 meters). These are going to be twisted into rope and used for the seat.
  • 1 piece of paracord 10 feet long (3 meters). This one is going to be used for the bracing cord, reinforcing the chair.
  • sticks of differing lengths for the seat. These should be about 1/2 an inch in diameter (12mm).

Besides these building materials, tools are needed. A knife, saw, axe are the basics. So if you are making the chair in a camping, bushcraft or a similar situation, then this is what you will use.

If you are making the chair at home, you will be able to use more advanced tools. A drill, a chain saw, a vise and so on.

So, the situation you are in will determine the tools you have available and how easy it is to make such a chair.

Now, on to a description of the making process.

paracord camp stool top view

Making a paracord camp chair

The camp chair is started by taking the three, 2 foot long poles used for the frame and making notches onto both ends of the poles. If you have a drill, make holes instead.

The notches/holes are done parallel on both sides, meaning they face the same direction. The notches should be about 3/4 of an inch deep (19 mm), while the holes are about 1/2 inch in diameter (12mm).

Once done, we lash the poles together at the center using our 15 foot long piece of paracord (4.5m). The result is a nice and stable tripod.

Then we twist our three, 7 foot (2.1 meters) long pieces of paracord into a single piece of rope. This is going to be our support rope at the top of the chair, forming the seat.

We switch to our 10 foot (3 meters) long piece of paracord and use it as a bracing rope. The bracing rope travels through all of the holes/notches in the poles in a zig-zag pattern. To do this pass your cord through a hole at the bottom, then through a hole at the top of a pole, then back to the bottom and so on. Eventually, the two ends are going to meet.

Now the ends of both cords need to be joined. I recommend that you join the cords of your top, support rope first. Use the double sheet bend to do so and make sure that the cord is tight. Secure each end with an additional half hitch for added security.

Then join the two ends of the bracing cord, again using a double sheet bend.

Finally, we are going to form the seat. Take your sticks which are about 1/2 a foot in diameter. Insert them one by one into the lay of the top rope. We lift one strand in the lay of the rope and insert our stick. With each stick we need to do this two times.

To make inserting sticks a bit easier, you can use a fid (it is easy to carve one yourself) or you can sharpen up the sticks, making them easier to push through your top rope.

Naturally, a text description only goes so far. See the making process live in the video below.

The post Paracord camp chair appeared first on Paracord guild.

Endless falls paracord key fob

$
0
0

In this tutorial I show you how to tie a paracord key fob with the Endless falls design.

The Endless falls weave spawned a bunch of variations and this key fob is made with one of them. I like it since it includes 3 colors and has a nice, V-shaped look.

The key fob works well for house keys, car keys and other items.

paracord-endless-falls-key-fob

So, let’s take a look at the supplies needed and then move on to the tying process.

Supplies

You will need these few items to make the key fob:

endless-falls-key-fob endless-falls-key-fob-red-green

The tutorial

Tying the key fob is simple. We will first set up the strands, then do our weaving in two steps and then finish up.

Setup

endless-falls-paracord-key-fob-1

Take one of the strands and make a loop in the middle of the strand.

endless-falls-paracord-key-fob-2

Take a second strand, fold it in half and feed it through the loop.

endless-falls-paracord-key-fob-3

Pull the two ends of your second cord through the bight.

endless-falls-paracord-key-fob-4

You now have a lark’s head knot.

endless-falls-paracord-key-fob-5

Insert the final, third cord though the lark’s head knot. Make sure that the ends are of equal lengths and tighten up.

endless-falls-paracord-key-fob-6

Our setup is now complete.

Tying

When tying the key fob we basically alternate between two colors. Each color is represented in one of the two steps.

Step 1

endless-falls-paracord-key-fob-7

Place your two middle cords under the bottom cords.

endless-falls-paracord-key-fob-8

Take the two top cords and wrap them around the first two cords we used, wrapping towards the outside.

endless-falls-paracord-key-fob-9

Take the two bottom cords and also wrap them around the first two cords, wrapping towards the outside.

endless-falls-paracord-key-fob-10

Tighten up by pulling gradually on all of the ends. Step 1 complete.

Step 2

In step 2 we tie the same way as in step 1, but the colors are a bit different.

endless-falls-paracord-key-fob-11

Pass the two middle cords under the two bottom ones.

endless-falls-paracord-key-fob-12

Take the top two cords and wrap them around the first two cords, towards the outside.

endless-falls-paracord-key-fob-13

Wrap the bottom two cords around your first two cords as well, wrapping towards the outside.

endless-falls-paracord-key-fob-14

Tighten up by gradually pulling on all of the cords. This is the end of step 2 and we now move to step 1 again.

endless-falls-paracord-key-fob-15

Step 1.

endless-falls-paracord-key-fob-16

Step 2.

Finishing

endless-falls-paracord-key-fob-17

Keep weaving until you get 4 “V” shapes of one color and 3 “V” shapes of the other color. We will now finish the key fob using the lanyard knot.

endless-falls-paracord-key-fob-18

Make a loop with the left end of your two “first cords”.

endless-falls-paracord-key-fob-19

Pass the right end under the loop.

endless-falls-paracord-key-fob-20

Over the top left cord, under the left end.

endless-falls-paracord-key-fob-21

Weave through the 3 cords in the loop: over-under-over. We have now tied a Carrick bend (note the diamond shape at the center).

endless-falls-paracord-key-fob-22

Take the top right end past the top left cord coming out of the weave.

endless-falls-paracord-key-fob-23

Then through the middle of the diamond shape at the center of the Carrick bend.

endless-falls-paracord-key-fob-24

Take the other, bottom left end past the top right cord coming out of the weave.

endless-falls-paracord-key-fob-25

And through the center of the Carrick bend, through the diamond shape. The lanyard knot is now tied.

endless-falls-paracord-key-fob-26

Before tightening up the lanyard knot, feed the remaining 4 ends through the lanyard knot. Note how I crossed the cords of my second color to keep a nice pattern.

endless-falls-paracord-key-fob-27

Tighten up the lanyard knot, trim the ends and add the key ring. Mission accomplished!

You can see the entire tying process in the video below as well:

The post Endless falls paracord key fob appeared first on Paracord guild.

Cow hitch variant- Piwich knot

$
0
0

This tutorial shows you how to tie the Cow hitch variant.
Most of us are very familiar with the regular Cow hitch. It is one of the most common ways of attaching rope onto objects. It is fast, easy and it works.
But the Cow hitch also has the downside of loosening up when not under tension. This results is a less attractive knot that tends to move instead of staying put.
This is where the Cow hitch variant comes in handy. It is a more secure version of the Cow hitch. Like with most knots, the security comes with a bit of extra complexity, but it is still easy to tie.

piwich knotpiwich hitch

The hitch is also known as the Piwich knot and it is featured in The ultimate encyclopedia of knots & ropework, a book by Geoffrey Budworth.

Now, let’s take a look at how to tie it!

Cow hitch variant tutorial

To tie the hitch you will need a strand of rope and an object to attach it to. It can be a ring, a buckle, rail or a bunch of other items.

cow-hitch-variant-1

The two items needed. Cord and an object to attach it to.

cow-hitch-variant-2

Pass the end of your cord through the ring.

cow-hitch-variant-3

With your back end pass over the front one, creating a loop.

cow-hitch-variant-4

With your end, pass through the loop, bottom up.

cow-hitch-variant-5

Pass over the front end for a second time.

cow-hitch-variant-6

Through the ring, bottom up.

cow-hitch-variant-7

Through the two loops (under the two strands).

cow-hitch-variant-8

Tighten up. Pull on both ends, then each end individually. Knot tied!

cow hitch variants

A few hitches tied onto a rail.

For more information on the tying process, take a look at the video tutorial below:

The post Cow hitch variant- Piwich knot appeared first on Paracord guild.

Paracord ball net

$
0
0

In this tutorial I show you how to make a paracord ball net.
This project is handy for transporting and storing balls for various sports.
The net that we are going to make is easy to do. You are using basic knots to accomplish the task, so it should not be all that hard. Net making is usually done using simple knots since it needs to be done fast and efficiently.

The net that we are going to make can be adapted to fit a small or a large ball, depending on how big you make the loops/openings in the net.

ball net paracord Let’s take a look at the supplies, then move on to the tying process.

Supplies

You are going to need the following few items:

  • paracord 550. 4 pieces, each 6 feet long (180 cm).
  • a carabiner or a short piece of paracord to lock the net together.
  • a small metal ring as the starting point for your net. You can also make a ring out of a piece of paracord.
  • scissors and a lighter to cut and melt your paracord.

We are now ready to begin making our ball net.

Making a ball net

paracord-ball-net-1

Start your project by attaching your 4 cords onto the ring. You can use the lark’s head knot, but I prefer using the Cow hitch variant.

Make sure that all the ends of your cords are of equal length.

paracord-ball-net-2

We are now going to start joining ends of our cords together. This creates our net.

Take a strand from a pair on the left and a strand from a pair on the right. Join them together using the Sheet bend.

paracord-ball-net-3

Take the left end and fold it into a bight.

paracord-ball-net-4

Feed the right end through the bight, bottom up.

paracord-ball-net-5

Pass under the bight.

paracord-ball-net-6

Then under the standing part of the right end, above the bight.

paracord-ball-net-7

Tighten up, making sure both ends are about the same length. Join the other ends the same way.

paracord-ball-net-8

After all the ends are joined you get 4 loops/openings.

paracord-ball-net-9

Start the next set of loops in between the previous loops.

paracord-ball-net-10

Again, take a strand from the left side and a strand from the right. Tie a sheet bend.

paracord-ball-net-11

Tighten up, making sure the two ends are about equal in length. Move on to the remaining ends and repeat.

paracord-ball-net-12

Once you place the second row of loops, you get a square net.

paracord-ball-net-13

We are now going to join our ends together for a third and final time. This time, instead of joining the two ends in the middle, join them on the side. This will make sure the knots do not get in the way when you are closing up the net.

paracord-ball-net-14

I recommend doing a second turn around the bight when tying these final 4 sheet bends. This will result in a more secure knot, the Double sheet bend.

paracord-ball-net-15

This is how the Double sheet bend looks like when tightened.

paracord-ball-net-16

After making the last 4 knots, test out your net. Take a carabiner and hook the last 4 loops. If you can hook all four nicely, then the net is big enough. If not, adjust the size of your loops.

paracord-ball-net-17

Finally, firmly tighten up your Double sheet bends. Cut and melt your ends, then flatten them (while still hot) to prevent them from slipping out of your knot.

Mission accomplished, you now have a functional ball net.

paracord basketball net

The post Paracord ball net appeared first on Paracord guild.

Paracord bolo tie

$
0
0

In this tutorial I show you how to make a bolo tie out of paracord.
The bolo tie is an interesting alternative to the classic tie. It has a different look, with metal tips and a concho (charm). Besides the exotic look, the bolo tie does not need to be tied and is adjustable. The concho slides up and down and adjusts the size of the neck loop.

paracord bolo tie concho starparacord bolo tie concho flower

I made a bolo tie for me and will be making one for my son so we can make ladies swoon at gatherings.

Traditionally, the bolo tie is made using leather or rawhide. But there is not a lot stopping us from trying one out rope as well!

Consider this tutorial as a jumping off point. We are going to learn the basics of bolo tie making and make a simple, eye pleasing bolo tie.

western paracord bolo tie

So, let’s take a look at the supplies, then make one!

Supplies

The bolo tie requires a few specific and a few common supplies. Most can be found online quite easily.

  • bolo tie tips. Two of these are used on the tips of the bolo tie. They provide some weight and they pull the tie neatly down.
  • bolo tie slide. The slide allows you to adjust the size of the neck loop. There are a ton of variations. Use one where you can easily adjust the size of the loops on the bottom (usually the cheap ones are the best for this, since they are fairly thin). If you can’t get a slide, take a part of a wine cork or a plastic cap and drill 2 holes into it to make a makeshift slide.
  • concho. This is the decorative piece on top of the slide. Often times it is a nice looking charm or the lone star (nickname and symbol of Texas).
  • 2 pieces of paracord 550, each 4 feet long (120 cm). This is enough for a 40 inch (1 meter) cord, the average length of a bolo tie. We will later on twist these two into a single strand to get a rope-like effect.
  • scissors and a lighter for cutting and melting our cords.
  • glue and tape (electrical or other).
  • pliers can come in handy for adjusting the bolo tie slide and assembling the concho.
bolo tie tips

Bolo tie tips.

bolo tie slide top

Bolo tie slide- top view.

bolo tie concho

Bolo tie concho with a rivet for attachment.

Now, let’s see how to make a simple bolo tie!

Bolo tie tutorial

We are going to start by twisting our 2 pieces of paracord into a single, rope-like cord.

Twisting our cords

We begin by taking our two cords and securing two ends together using a piece of tape.

Place the cords under heavy object. In my case, Christmas cookies- yes, they can be used to make things, not just make you fat :).

Take the left cord and twist it to the left (counterclockwise).

Then place your left cord over the right one.

Take the new left cord and twist it to the left (counterclockwise).

Place it over the right cord.

Take the new left cord and twist it to the left (counterclockwise).

And place it over the right cord.

Keep doing this until you reach the other two ends of our cords. Secure those two ends together using some tape.

The result is a single, twisted cord about 40 inches long.

Attaching the bolo tie tips

We are now going to attach the bolo tie tips. In my case, the tips are already a snug fit to the ends of my twisted cord.

Put a bit of glue into each tip (optional and not really needed if the tips are already a snug fit). Don’t use too much since it can be pushed out with the ends of our cord, making a bit of a mess.

Attach the tips in a screwing motion.

The end result on one side.

Both bolo tie tips attached.

Adding the concho

The concho needs to be prepared before we can use it. We will attach it to the bolo tie slide, making the two a single piece. You can do this by simply gluing the concho onto the slide, or better, attach the concho using a rivet (usually the concho comes with it as a 2 part set).

Drill a hole into the slide if the slide does not have one already.

Spread apart the bottom legs/pins of the slide.

Insert the rivet part of the concho into the hole in the slide, bottom up.

Place the concho on top of the rivet (on top of the slide).

Our progress so far. We now need to secure the rivet in place by applying pressure onto it.

Place a piece of leather or paper under the concho to protect it. Then squeeze the rivet into place.

The concho and slide are now ready to be used.

Place the two ends of your twisted cord into the legs/pins of the slide. Maybe you will need to adjust the size using pliers or by hand.

The concho is now attached and the bolo tie is complete. Quite easy, right?

paracord bolo tie

The post Paracord bolo tie appeared first on Paracord guild.


Heart paracord key fob- macrame style

$
0
0

Let’s make a love themed paracord key fob!
Today’s project is done in macrame. Using a simple knot multiple times we can get a nice looking “I heart you” pattern going. This is an ideal gift for Valentine’s day and pretty much any other day of the year!

heart paracord key fob The main knot for this project is the double half hitch, which I use 160 times! The key fob has 20 rows and each row consists out of 8 knots.
I would consider this project about medium in difficulty. While the technique is simple to learn, you do need to do a number of knots, which takes patience and persistence. But hey, if you put a lot of work into it, it kinda shows you care as well, does it not? heart paracord key fobheart paracord key fob blue red

In any case though, in this tutorial I will show you how to make one. Let’s start with the supplies!

Supplies needed

The supplies for this key fob are really basic. A few cords and a bit of hardware.

As far as the cords you will need, I recommend using cords 1-1.5 mm in diameter. The thicker the cords, the larger the key fob. In my case I am using cord 1.2 mm in diameter, which worked really well. So, you will need the following:

  • 1 piece of micro cord for the pattern. This one is 5 feet long (1.5 meters) and usually red.
  • 4 pieces of micro cord, each 4.5 feet long (1.35 meters). These can be black, blue, green. A nice contrast with red is recommended.
  • a piece of hardware for attachment to your keys. You can use a key ring or a lobster claw hook.
  • scissors and a lighter are the last items you will need. They are used to cut and melt your cords.
love paracord key fob

Now, onwards to the tutorial!

“I heart U” key fob tutorial

Below you will find a full picture tutorial as well as a video one. The first few rows of the key fob are demonstrated in more detail, so that you get to know the basic knot- the double half hitch. Then, after a few rows, we will speed things up, while still being quite clear at what needs doing.


Start by attaching your 4 main cords onto your key ring or hook. For this task we use the Lark’s head knot. We end up with 8 working ends.


Place your other, pattern cord over your ends. I call this one the guiding cord.

We will now begin tying. Remember that each row has 8 knots in it.

Row 1: work from left to right. Attach your first end onto the guiding cord using a Double half hitch. First one hitch.

The second hitch.

And tighten up.

Repeat with all of the ends to make your first row. This is a full, spacing row.

Row 2: work from right to left. Pass your guiding cord over your ends.

Attach your first end onto the guiding cord using a Double half hitch. Make your first hitch.

The second hitch.

Tighten up.

Repeat with all of the ends to create the second row. This is a full, spacing row.

Row 3: Work from left to right. Attach your first end onto the guiding cord.

We will now switch things around and attach the guiding cord onto our ends. First pass your second end over your guiding cord.

Attach the guiding cord onto the end using a double half hitch. First one hitch.

The second hitch.

Tighten up.

Attach your guiding cord a total of 6 times. Then finish off by attaching your last, 8th end onto your guiding cord. This makes our letter “I”. Basically we did a sequence of 1-6-1.

Row 4: right to left, this is a full, spacing row, done like row 2.

Row 5: left to right, this is a full, spacing row, done like row 1.

Row 6: right to left, attach 2 ends onto your guiding cord.

Then pass your next, third end over your guiding cord and attach the guiding cord onto the end.

First hitch.

Second hitch.

Tighten up.

Attach your guiding cord onto the fourth cord as well, then attach 4 ends onto the guiding cord. We did a sequence of 2-2-4.

Row 7: left to right, we have a sequence of 3 ends attached, then the guiding cord attached 4 times and then 1 end attached. So a sequence of 3-4-1.

Row 8: right to left, we have a sequence of 2-4-2.

Row 9: left to right, a sequence of 1-4-3.

Row 10: right to left, a sequence of 2-4-2.

Row 11: left to right, a sequence of 3-4-1.

Row 12: right to left, a sequence of 2-2-4.

Row 13: left to right we have a full, spacing line.

Row 14: right to left we have a full, spacing line.

Row 15: left to right, a sequence of 2-5-1.

Row 16: right to left, a sequence of 6-1-1.

Row 17: left to right, a sequence of 1-1-6.

Row 18: right to left, a sequence of 1-5-2.

Row 19: left to right we have a full, spacing line.

Row 20: right to left we have a full, spacing line. Voila, done!

Cut and melt the ends and you are done. Now run off and gift it to someone special!

The entire tying process is also available in video form:

The post Heart paracord key fob- macrame style appeared first on Paracord guild.

Lazy man’s paracord dog leash

$
0
0

Today’s paracord project is an interesting dog leash.

The lazy man’s dog leash is not called such because it would be made or used by a lazy man. The “lazy man” part of the name refers to the way the leash is made. Instead of tying and braiding the leash using a single working strand at a time, we are using two. This is a way speeds up the making process and makes it simpler.

lazy man paracord dog leash

The concept behind this design originates from Bruce Grant’s Encyclopedia of rawhide and leather braiding. The book describes several techniques done in the style of two strands at a time, so the “lazy man’s” way.

The result is a dog leash with an unique look. It is fairly easy to tie and it stands out among other designs. Naturally, every design also comes with a specific number of challenges to overcome. In the case of the “Lazy man” style, the most important one is to keep your cords lined up one next to the other when using them.

lazy mans dog leash

With this said, let’s move on to the tutorial. This time, the tutorial is in video form and it is quite a quick one comparing to some of my other tutorials (still shows all you need to make it).

Supplies

The supplies for this leash are the same as with most dog leashes:

  • paracord 550. We will need 4 strands. For a 4 foot leash I recommend 17 feet per strand. For a 2 color effect, use 2 strands of one color and 2 of the other color.
  • snap hook or a carabiner used to attach the leash to a dog collar.
  • scissors and lighter, a standard for working with paracord.

The tutorial

As mentioned earlier, the full tutorial is available below in video form. Still, a quick description of the making process:

I start by feeding my 4 strands through my snap hook and making sure the ends are of equal length. This results in 8 working ends.

I pair the ends up, getting 4 pairs of 2 strands. Then I tie a footrope knot, using 2 strands at a time (much like tying a 4 strand footrope knot).

After tying the footrope knot I then start braiding the leash. Again using 2 strands at a time I start a round braid. This results in a braid resembling the 4 strand round braid, but done with 8 strands (4 pairs of 2).

I braid until I have about a foot, maybe a foot and a half remaining in my working ends. Then I fold a part of my leash into a handle and splice in my 4 pairs of strands back into the braid.

Finally I tie either a footrope knot or a multi strand turk’s head knot to cover the splice.

Now, let me show you the whole process!

The post Lazy man’s paracord dog leash appeared first on Paracord guild.

Macrame leaf

$
0
0

This time we are making a macrame leaf!

Some projects just catch your eye. For me, the macrame leaf is one of them. It works well as a key fob or charm. The ladies on Facebook suggested that if you turn it around, you can also make a Christmas three out of it.

The project is in my opinion about medium in difficulty. The knots used are basic ones, repeated a number of times. The challenge I see in making this project is the same as with any macrame project. You need patience and persistence to do it.

green macrame leaf

From the images you can see the reward, a beautiful macrame leaf. But dare you attempt it?

This time the tutorial is in video form, found below. Showing the tying process in image form would probably result in quite a long page.

First, let’s cover what you will need for the project.

Supplies needed

You will need:

  • 13 cords. For my projects I like to use micro cord which has a diameter of 1.2mm. I recommend using lengths of 2 feet (60 cm) per cord. This can be optimized a bit once you make a leaf or two, but I would start with this length.
  • pins or tape to secure your project while you work on it.
  • scissors and a lighter for cutting and melting your ends.

Tutorial

The video tutorial can be found below. Just to start you off, the knots used in this project are the Matthew Walker knot for the initial stopper knot. A clove hitch (with an additional turn with both ends) is used to attach new cords onto the two core strands. A reverse lark’s head knot is used to attach cords at the start. Finally, for most of the tutorial you will be using one of the basic macrame knots, the double half hitch.

With that said, brake out the popcorn and let’s take a look at the video!

The post Macrame leaf appeared first on Paracord guild.

Heart rate stitch- EKG stitch

$
0
0

Today we stitch a paracord bracelet with the heart rate stitch.

This stitch is another one designed by Ted Potter. When practicing this stitch I had the luck of my wife taking a look. As a doctor she did modifications to the original stitch to more closely resemble a healthy heart rate. So this is a modified version of the original.

Unlike the Heart stitched bracelet, this bracelet is more health/medical themed.

ekg stitch

With that said, let’s talk supplies, then stitch away!

Supplies needed

You will need the following items:

  • a cobra knot bracelet.
  • micro cord, a length of 9 inches (23 cm) for stitching the heart. I recommend red color.
  • micro cord, a length of 3 feet (90 cm) for the heart rate pattern. Blue, green, black all work well.
  • a lacing needle is recommended.
  • scissors and a lighter for cutting and melting your cords.

The tutorial

Below you will find a photo, as well as a video tutorial on the stitch.

Stitching the heart

Start by finding the middle point in the bracelet.

Attach your cord (9 inches long) on the underside of the bracelet.

Work your cord onto the top side, through a square knot in the middle of the bracelet.

Pass your cord top down, in between two square knots at the top.

Come up in between the two square knots to the left.

And down, in between the two square knots on the left.

Up through the bottom square knot, like at the start.

Top down, in between two square knots at the top.

Bottom up at the middle of the heart at the top.

Finally, top down in between two square knots to the right.

Secure the end on the bottom, finishing your heart. Trim the ends.

Heart rate pattern

Here, you can see where we will be placing the peaks of the heart rate. Essentially, every two square knots on each side of the heart.

Attach your cord (3 feet long) on the bottom of the bracelet.

At the side of the bracelet, work your cord to the top side of the bracelet.

Work your cord over the top to the first peak (4 square knots away from the heart), through the middle of the two core strands.

Then pass up in between the two square knots above.

Pass over the top, in between two square knots on the bottom.

Up in between the two core strands.

Down at the end of the diagonal cord.

Up at the top, in between the two square knots.

Down in between the two core strands below.

Up in between the two core strands to the right.

Pass two square knots to the right and repeat the first peak.

Like this.

Under the heart. Start the next two peaks, two square knots to the right.

Like this.

Work your strand to the side of the bracelet and down.

Secure the cord in place at the bottom. Cut the ends and you are done!

I usually re-tighten the heart rate pattern from start to finish for a more consistent look.

A full video on the stitching process is also available:

The post Heart rate stitch- EKG stitch appeared first on Paracord guild.

King’s crown button knot

$
0
0

In this tutorial we take a look at the King’s crown button knot.

The name for this knot is quite to the point. The knot resembles the shape of a king’s crown and it is a 2 stranded stopper/button knot. It is tied very similarly to the lanyard knot, just with a few more steps. So, if you want to spice up your projects (lanyards, bracelets, key fobs), consider using the King’s crown button knot over the regular lanyard knot.

Let’s jump right into the tutorial!

Tying the King’s crown button knot

Below you will find both a photo and a video tutorial on the knot. One thing I really need to emphasize is that the trick to this knot is the tightening. So once tied, tighten carefully to get a nice look. I had to tie the knot a few times before I got the tightening down, so do not despair!

Take 2 strands.

Twist the left strand into a loop.

Pass the right strand under the loop.

With the right strand pass over the top left strand and under the left end.

Weave over-under-over through the loop, creating a Carrick bend. Note the diamond shape at the center.

Take the top right end counterclockwise through the next opening.

Take the bottom left end counterclockwise through the next opening.

Take the left end counterclockwise through the next opening.

Take the right end counterclockwise through the next opening.

With the bottom end pass over the top right end.

Then through the middle of the Carrick bend, so through the diamond shape at the center.

Take the top end over the top left cord.

And again through the center of the Carrick bend, next to the other end.

Square up the knot and tighten it up.

Remember that tightening should be done gradually and that the top of the knot is wider than the bottom.

Below is a full video tutorial to boot:

The post King’s crown button knot appeared first on Paracord guild.

Innomiknot- the knot without a name

$
0
0

In this tutorial I show you how to tie the Innomiknot.

This is a rare knot. It is featured in The knot bible by Nic Compton. Supposedly the knot was used in the Pacific to tie down airplanes. Since the knot is a hitch and a secure one at that, this could indeed be the case. It has two distinctive features, well worth mentioning:

  • the knot is fast and easy to tie
  • it is a quick release knot, which you can untie in a moment.

Some attention is also given to the name, the “Innomiknot”. In Latin it should mean something like “the knot without a name”. Alas, this is something I can not confirm, my Latin is fairly non existent. But if the name of “the knot without a name” is Innomiknot, does it not have a name? This sort of a paradox is sure to cause an infinite loop on at least some computers :).

In any case, the knot is practical, easy to tie and untie and a fun one to know. So, let’s take a look at how to tie it!

Tying the knot

Below you can find both a photo and a video tutorial on the knot.

Take a cord and pass it under the object. In my case a rail.

Pass over the top of the rail onto the left side of the standing end.

Pull out the cord on the top and twist it for a total of 360 degrees- a full turn.

Pass the working end under the standing end.

Using your working end create a bight.

Pass the bight into the top loop.

Tighten up the knot by pulling on the standing end. Voila, the Innomiknot!

A video tutorial is available here:

The post Innomiknot- the knot without a name appeared first on Paracord guild.

Mystic knot- the Pan Chang knot

$
0
0

In this tutorial we will learn how to tie the Mystic knot.
This knot is also known as the 2×2 Pan Chang knot in Chinese knotting. I have learned it as the Mystic knot though from The knot bible, a book by Nic Compton.

It is a mostly decorative knot that you can place on various items, necklaces come to mind immediately. It is a flat knot.

pan chang knot

The trick, like in many decorative knots is in the tightening of the knot.

Let’s take a look at the tying process!

Mystic knot tutorial

The items that I usually use to practice the knot are the following:

  • Cord. In the tutorial below I use 7 feet of paracord 550. This is more than you need, but the knot uses a lot of slack before you tighten it up.
  • pins to hold the knot while I am tying it.
  • a surface to stick pins into. Cardboard, a cork board or even wood will work well.

Now, the tying process! Below you can find a photo, as well as a video tutorial.

Take your cord and fold it in half. I recommend pulling a bit more cord into the left end (at least a foot- 30 cm). We will be using the left end more than the right end.

Create two more bights, one with each end, facing down.

With the right end make a bight and weave it through the bights. Under-over-under-over.

Make a second bight with the right end and again weave it under-over-under-over.

With the left end pass over 4 at the top.

Then back to the left under 4.

Repeat again at the bight below. Over 4.

Then back to the left, under 4.

Then weave up to the top. Under-over 3-under-over 3.

And back down. Under 2-over-under 3-over-under.

Repeat with the bight on the right. Towards the top, under-over 3-under-over 3.

And down, under 2-over-under 3-over-under. The knot is tied.

Now, slowly and gradually tighten the knot up. The tightening is the most important part!

Below you can find a video demonstration of the knot:

The post Mystic knot- the Pan Chang knot appeared first on Paracord guild.


Double core bracelet setup with a single working end

$
0
0

This tutorial shows you how to make a double core setup for a bracelet, with a single working end.
The following setup has a niche application in making bracelets with a double core (4 stranded core). Sometimes you need only a single working end, or an odd number of them (which you gain by adding strands, which each add 2 working ends).
In those cases, the setup found below works well. I have played around quite a bit trying to find something that looks good and is functional, this is the end result.

The tutorial

To demonstrate this setup I am using the following items:

The setup is done using 4 cow hitches. It is an adaptation of the regular, double core setup for bracelets. So let’s begin!

Hitch #1

Start by feeding your cord through one part of the buckle, top down, then come over the standing end.

Pass under and through the buckle.

And into the loop. Note that my working end is short, since I will not be needing it much more.

Feed the short end through your first cow hitch. This completes the first hitch. I recommend not tightening the cow hitch just yet, we will be passing another cord through it later on.

Hitch #2

The second hitch is done onto the other part of the buckle.

Travel down from your first hitch, pass top down through the buckle and over the standing end.

Pass under and through the buckle.

And through the loop.

Second hitch complete.

Hitch #3

To start the third hitch we need to travel back to the first buckle end, turn around and come back to the second, bottom end of the buckle.

Travel up and through the first hitch.

Tighten up the first hitch firmly and turn back down with your working end.

Start your third hitch next to the second one. Top down through the buckle and over the standing end.

Under and through the buckle.

Through the loop.

Third hitch complete.

Hitch #4

For the final, fourth hitch we move back to the top, next to the first hitch.

Pass top down through the buckle.

Through the bight in the middle- in between the 4 cords.

Under and through the buckle.

Into the loop.

Tighten up and trim the short end. Job complete!

I hope this setup works well for you, just as it does for me! Have a nice day!

The post Double core bracelet setup with a single working end appeared first on Paracord guild.

Trojan horse paracord bracelet

$
0
0

In this tutorial we make the Trojan horse bracelet.

This bracelet is a nice one to look at, with a zig zag pattern going along the middle of the bracelet. It is a design by Pavel Makurin, better known as CETUS550. The design can be found in his book Paracord live- part 1.

trojan horse bracelet patterntrojan horse paracord bracelet tutorial

The bracelet is fairly easy to tie, so let’s proceed to the supplies!

Supplies

To make the bracelet, you will need the following:

Now, on to tying!

The tutorial

Below you will find both a photo and a video tutorial on the bracelet.

The setup for the bracelet is one that I just posted. The double core, single working end setup. We will pick up from the point where you have setup your cord and buckle.

The double core (4 stranded core) setup with a single working strand.

Step 1

With the right end coming from the right, wrap your cord around the two middle strands, going under the standing end.

Wrap around the left strand and under the standing end.

Tighten up. We now move on to step 2.

Step 2

This time our working end is coming from the left. Wrap around the two middle strands, going under the standing end.

Wrap around the right strand and under the standing end.

Tighten up. We now switch back to step 1.

Step 1- one more time

Wrap around the middle two strands.

Around the left strand and under the standing end.

Tighten up. Switch to step 2.

Step 2- one more time

Wrap around the two middle strands.

Wrap around the right strand and under the standing end.

Tighten up. Keep switching between step 1 and step 2 until you fill the bracelet from one buckle end to the other.

Once the weaving is done, work your end to the bottom of the bracelet.

Then cut and melt the end. Done!

And here is a video tutorial to boot:

The post Trojan horse paracord bracelet appeared first on Paracord guild.

Fishtail eccentric paracord bracelet

$
0
0

This tutorial shows you how to tie the Fishtail eccentric paracord bracelet.

The following design is a modification of the Fishtail paracord bracelet. It was introduced by Pavel Makurin, better known as CETUS550. The design can also be found in his book Live paracord, part 1.

It is an easy, quick bracelet to tie that is also quite comfortable. It will also work well as a dog collar if adapted to one.

Personally I like the single color version, but you can choose to do it in two colors as well.

With that said, let’s take a look at what you will need.

Supplies

You will need:

  • paracord 550. You will need a single strand. For a 6 inch weave you will need about 10 feet of cord. Add about a foot extra for every additional inch of weaving.
  • a 5/8 inch bracelet buckle is recommended.
  • a bracelet jig is useful for holding your bracelet in place. I made one myself quite easily.
  • scissors and lighter for cutting and melting your cord.

Now, on to tying.

Tying the Fishtail eccentric

We start with a double core bracelet setup. This one takes a bit of time to do. The result is a 4 stranded core and 2 working ends.

Bracelet setup at the top.

Bracelet setup at the bottom.

Step 1

Take the left end and pass it over 3, then back to the left, under 3. Tighten up, then move on to step 2.

Step 2

Take the right end and pass it over 3, then under 3 and back to the right. Tighten up, then move back to step 1.

Step 1- repeat

Left end and passes over 3, then back to the left, under 3. Tighten up, then move on to step 2.

Step 2- repeat

Right end passes over 3, then back to the right, under 3. Tighten up, then move back to step 1.

Keep weaving until you reach the other buckle end.

Finally, on the bottom side of the bracelet cut and melt the two ends. Bracelet complete!

A video tutorial is available below:

The post Fishtail eccentric paracord bracelet appeared first on Paracord guild.

Woven paracord belt

$
0
0

In this tutorial we make a woven paracord belt.

This version of the paracord belt is comfortable, reasonably simple to make and in my opinion looks great. The weaving process takes a bit of getting used to, but once you practice it a bit, you are able to quickly make the belt.

The pattern of the belt is quite eye pleasing.

There are a few aspects of the belt that required quite a bit of work to design: the belt keeper and the tapered tip. Both turned out well, as seen below.

Let’s first take a look at the supplies used to make the belt.

Supplies

Below we have a list of supplies used to make the belt. I am aiming for a 4 foot long belt (120 cm). The cord lengths are a rough approximate- they really depend on how tight you weave the belt.

  • 5 strands of paracord 550. Each strand is 15 feet long (4.5 meters). These strands are our working strands.
  • 1 long strand of paracord, 27 feet long (8.2 meters). This strand will hold the belt together.
  • 1 short strand of paracord, gutted (inner strands removed). This strand is 3 feet (90 cm long) and will be used for the belt keeper.
  • a belt buckle. I am using a 1 inch (2.5 cm) wide belt buckle. I recommend one with a round tongue since it slides more easily through the weave.
  • scissors and a lighter for cutting and melting the cords.

Now let’s start weaving!

Woven paracord belt tutorial

Below is a full photo tutorial and at the end, a video tutorial to boot.

We will start by setting up our project.

Setup

Begin by securing your buckle in some way. I usually attach a scrap piece of cord onto the buckle, then tape the cord ends down using masking tape.

Attach 4 out of the five cords onto the buckle, two to the left, two to the right of the tongue. Make sure all the ends are of equal lengths.

Place the fifth cord on top of the first four. Attach it onto the buckle using a cow hitch.

Left end passes under and through the buckle.

And under the horizontal cord.

Right end passes under and through the buckle.

And under the horizontal cord.

Tighten up a bit. We have 5 ends on the left of the tongue, 5 on the right.

Feed the 27 foot long cord through the cow hitch and the cords. Make sure that the two ends of the long cord are of equal length.

Weaving the belt

We make the belt by weaving the two long, side strands through the 10 working ends.

Step 1

Weave the left end in a sequence of over-under. The first strand you go over is the one coming out of the cow hitch.

Note that we are weaving over the front ends and behind the back ends.

The right end doubles up the left end.

Step 2

In the next row we again weave through the working ends, this time starting under the first strand, then continuing over-under.

Over the top strands from the previous row, under the back ones.

We double up the left end with the right end.

Tighten up a bit to make the weave even. Pull on all of the ends- no need to tighten too hard.

Step 1- repeat

We now switch back to step 1.

Weave the left end in a sequence of over-under.

Over the top strands from the previous row, under the back ones.

Double up the left end with the right end.

Step 2- repeat

Weave the left end through the working ends in a under-over sequence.

Over the top strands from the previous row, under the back ones.

Double up the left end with the right end.

So this is the weaving process. Once you get used to it, it is a fast one.

Building the keeper

We will now make the belt keeper. This is best done near the start of the project.

Pull the cord from one of the side ends (cow hitch) into the horizontal strand.

Once you pull the slack into the horizontal strand you already have a functional keeper.

I am going to cover it using cobra knots to bulk the keeper up and make it look better.

Step 1

Pass your 3 foot long, gutted cord under the keeper.

Pass the left end under the keeper strand, over the right end.

Pass the right end over the keeper strand and into the loop on the left.

Tighten up.

Push the first cobra knot up to one side of the belt.

Step 2

Pass the right end under the keeper strand, over the left strand.

Pass the left cord over the keeper strand and into the right loop.

Tighten up.

Step 1- repeat

Left strand goes under-over.

Right strand goes over the top into the loop on the left.

Tighten up.

Step 2- repeat

Right end goes under-over.

Left end goes over the top and into the loop on the right.

Tighten up.

Keep lining up cobra knots until you cover the keeper. Then cut and melt the ends.

Tapering the belt

Weave until you reach the length of the belt that you would like.

Take a look at the two side strands and drop the one going to the bottom of the belt.

Weave through the remaining 9 ends.

Drop the two side strands.

Weave through the 7 remaining ends.

Drop the next two side strands.

Weave through the 5 remaining ends.

Drop the two side strands.

Pass the two strands holding the belt together over the three remaining ends.

Drop the two side strands.

Take the last strand and pass through the opening.

This creates a hitch.

Tighten up the belt, then cut and melt the ends.

The belt end tip once the ends are cut and melted.

Guys, thank you for joining me for this project! I hope your pants will stay up from now on!

Take a look at the video tutorial if you would like to see the belt built live:

The post Woven paracord belt appeared first on Paracord guild.

Paracord necklace- quick deployment

$
0
0

In this tutorial we will make a simple, quick deployment paracord necklace.

Besides various paracord bracelets, a necklace can be used to store cord as well. It can be an additional or an alternative storage method to the bracelet. So, do consider the necklace! It is comfortable, easy to make and for those that are not into bracelets, this is an option to wear some cordage on you.

For me, this is an important item to have around. I learn how to work with rope daily, so I really need some cord around, especially when out, where I don’t have my stash of cord. If I need to quickly make something or make a repair, I can unravel the necklace and get a long piece of cord.

The necklace will hold anywhere from 7-10 feet of cord on the average neck, depending mostly on the style you choose to go with. A choker style holds less cord, while a regular, loose necklace will hold more.

What will I need to make the necklace?

The necklace requires minimal supplies. Use the following:

  • cordage. I use type 1 paracord, but regular, 550 paracord will work as well. Take at least 8 feet of cord (2.4 meters) for the average neck size.
  • a necklace connector is used for two reasons- it makes the necklace easy to put on and off. Secondly, it acts as a safety mechanism. The connector will open if your necklace snags onto something, preventing it from becoming a choking hazard. I highly recommend using this one. A threaded necklace connector works well if you can find one, if not, some glue can be used to make sure the ends stay in the connector.
  • scissors and a lighter are used to cut and melt the cord.
necklace connector

An example of a necklace connector.

Paracord necklace tutorial- quick release style!

This necklace is made using a rope shortening technique called “daisy chaining”. It allows you to pack quite a bit of cord into a rather short necklace. Plus the technique is a quick release one, meaning that you can easily unravel the necklace when you need the cord.

Setup

We begin our necklace by tying a slip knot near one end of your cord.

Make a loop.

Make a bight with the working end.

Feed the bight into the loop.

Tighten up the slip knot.

Daisy chaining

Now we proceed with our main technique.

Make a bight with the working end.

Feed the bight into the previous loop.

Tighten up. This is all we are doing. Let’s do one more!

Make a bight with the working end.

Feed the bight into the previous loop.

Tighten up.

Continue daisy chaining until you reach a sufficient length for your necklace.

Feed the working end into the last loop.

And tighten up. To unravel the necklace you simply remove this end from the loop and pull on it.

Finally, attach the necklace connector onto the ends. I usually melt the ends into a mushroom tip, add a bit of glue and push them into the connector ends. With that our project is complete!

Here is a video tutorial on the necklace:

The post Paracord necklace- quick deployment appeared first on Paracord guild.

Viewing all 149 articles
Browse latest View live