Quantcast
Channel: Paracord guild
Viewing all 149 articles
Browse latest View live

Bracelet sizing- how long should a bracelet be to fit?

$
0
0

In this article we learn how to size bracelets.

Making a bracelet for yourself is easy, you can adjust it as you are tying it. The problem of sizing bracelets becomes apparent when you are making bracelets for other people. Because the wrist sizes vary, you will need a method for calculating what bracelet length you need for a specific wrist size. The whole point of doing this is to avoid getting your bracelets returned due to a bad fit.

The person who laid the theory for this article is Sam Scafferi, who wrote on the subject long ago.

The problem

A 6 inch bracelet will not fit a wrist that is 6 inches in circumference. It is too small.

The issue is the thickness of the bracelet. You can easily test this by taking a piece of paper and wrap it around your wrist. Mark your wrist size on the paper.

Your wrist size and the length of the paper strip will be about the same. This is due to the fact that the paper strip has almost no thickness.

A bracelet the same length as the paper strip will not fit you at all.

bracelet-sizing

Due to the thickness of the bracelet, the inner circumference of a bracelet is smaller than that of the assumed, middle one.

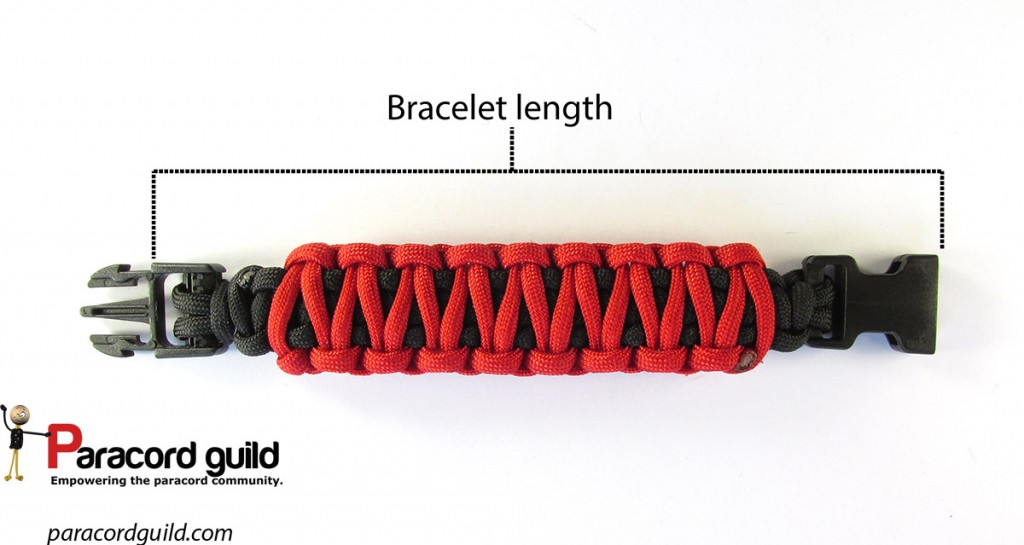
What we are looking for when making a bracelet is the length of the bracelet for a specific wrist circumference. We measure this by laying our bracelet out and measuring all the parts that add to the length of it (basically the weave and the buckle).
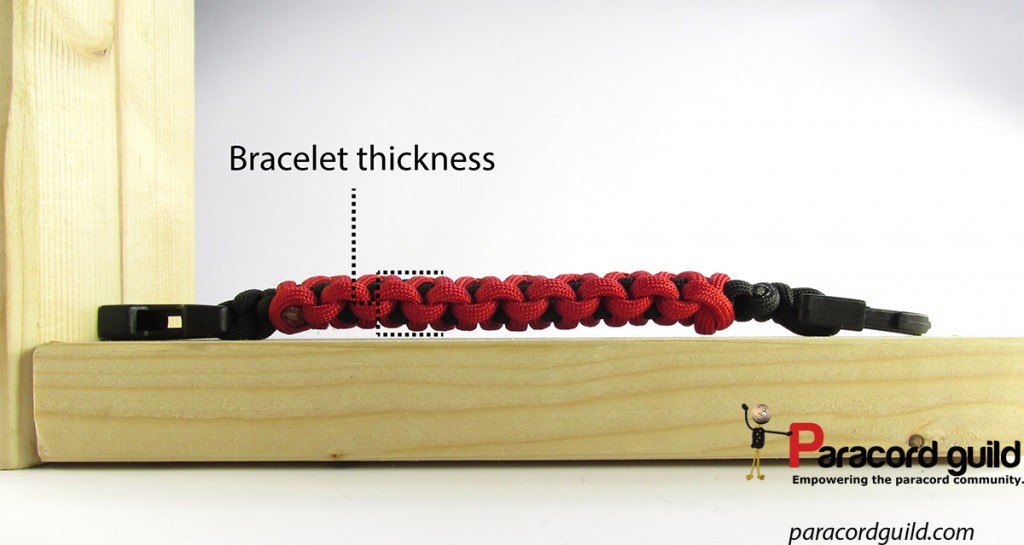
Thickness

So, the problem is in the thickness of the bracelet. When we have that, we can then use a simple equation to get the bracelet length we need.

So how do you measure the thickness of your bracelet? Simply make a small length, then measure it. Yes, it is that simple!

bracelet-thickness

Solving the required bracelet length

bracelet-length

When determining your bracelet length we are going to use a simple equation found below. Another piece of information, that should also be included in the bracelet length calculation is the “fit”.

Basically, we know two fits:

  • close fit, also called a snug fit is a fit where the bracelet is not able to move much on the wrist. This is achieved by making a bracelet the exact length as calculated below
  • loose fit, where the bracelet is larger than the wrist. This makes it less tight. To achieve this you add anywhere from 1/16 of an inch to 1/4 inches to the length of the “snug fit” to get a loose fitting bracelet.

To determine the bracelet size you need use the following equation:

The length of the bracelet= Wrist size+(3.14159*thickness of the bracelet)

Breaking it down and example

So, we got a wrist measurement from a client. We also know the thickness of the bracelet, since we measured it. We simply insert that information into the equation and off we go!

An example

We got a wrist measurement of 6 inches. We measured the bracelet thickness of the design we are making, and it was at 0.375 inches. We also know that we need to make a snug bracelet, meaning we will not add to the total length to make it a loose fit.

With that information, we crunch the numbers:

The length of the bracelet= 6+ (3.14159*0.375)

The length of the bracelet=7.18 inches

So for a 6 inch wrist of the stated thickness, we need to make a 7.18 inch bracelet. Note that the actual weave will be less than that, since the total length includes a buckle!

In conclusion

The simple equation above will help you make bracelets of proper length. Getting bracelets returned is not in the interest of you, or your customers. Using this simple method means you will save funds and time.


The post Bracelet sizing- how long should a bracelet be to fit? appeared first on Paracord guild.


Long 2 bight turk’s head knot

$
0
0

In this tutorial I will show you how to tie the long 2 bight turk’s head. The interesting thing about this style of turk’s head is that the length can be controlled by you. Hence the name “long”. The long turk’s head comes in a variety of bight numbers, the 2 bight being the smallest, with 3 and 4 bights also being quite common. The more bights, the wider object you can wrap. In general, the 2 bight version featured here is used to cover items the width of a dowel rod. Doubled, it also has uses for making lanyards.

With that said, let’s tie one!

2-bight-turks-head

Another look at the knot, tied around a dowel rod.

Long 2 bight turk’s head knot tutorial

The knot can be tied onto many objects, in the tutorial I am using a PVC pipe as a mandrel. You are also going to need a piece of paracord, I highly recommend a lacing needle as well (learn how to make a lacing needle in this tutorial). Follow the few simple steps below to tie this handy knot.

2 bight th (1 of 10)

Wrap your mandrel as many times as you need.

2 bight th (2 of 10)

Wrap the cord back to the left, making a series of X shapes or crossings.

2 bight th (3 of 10)

Wrap towards the right again, going between the previous wraps to the right.

2 bight th (4 of 10)

Cross the cord that is heading back to the left.

2 bight th (5 of 10)

Go under the first cord, then follow the cord heading to the left in an over-under sequence.

2 bight th (6 of 10)

The next cord would therefore go over.

2 bight th (7 of 10)

And the next under.

2 bight th (8 of 10)

Once you reach the left side, cross the last cord.

2 bight th (9 of 10)

Wrap around and place the working end next to the standing end.

2 bight th (10 of 10)

This completes the knot. At this point you can start doubling it up by simply following the standing end through the entire knot.

The video below should be helpful as well:


The post Long 2 bight turk’s head knot appeared first on Paracord guild.

How to tie the herringbone knot

$
0
0

In this tutorial we will take a look at how to tie the herringbone knot.

The herringbone knot is a decorative, fancy knot that is used to decorate handles and other objects. It is particularly interesting when tied in two colors, which is done by tying a skeleton knot in one color, then adding an interweave of a different color.

A couple of images of the knot:

herringbone-interweavetwo-color-herringbone-knot


The knot is an interweave of two turk’s head knots of the same number of bights and parts, meaning that you would interweave a 5 lead, 4 bight turk’s head with another 5 lead, 4 bight turk’s head.

This would result in a 10 lead 8 bight herringbone knot.

Like the gaucho knot tutorial, this tutorial will be descriptive as well as presented via video, because I feel that photographs are not adequate to present the tying process.


herringbone-coveringherringbone-wrap

Herringbone knot tutorial

Prepare a piece of paracord or rope. You will also need an object to wrap. I use a plastic pipe as a mandrel. The knot can then be slid of the mandrel onto the object you want to wrap or tied directly onto it. A lacing needle is recommended.

In this tutorial we will interweave a 5l4b turk’s head, so start by tying it.

  1. Take the working end from the right of the standing end and pass it to the left of it
  2. follow the standing end to the top of the knot (using the same sequence of under-over-under-over), then pass under it
  3. on the next bight to the left, go down under-over-under-over-under two (U1-O1-U1-O1-U2)
  4. on the next bight to the left go up using the same sequence as before of under-over-under-over-under two (U1-O1-U1-O1-U2)
  5. to go down again (always starting with the bight to the left), we change the sequence a bit, which is now under-over-under-over two-under two (U1-O1-U1-O2-U2)
  6. then up again, using the same sequence of under-over-under-over two-under two (U1-O1-U1-O2-U2)
  7. we again change the sequence going down to under-over-under two-over two-under two (U1-O1-U2-O2-U2)
  8. and up under-over-under two-over two-under two (U1-O1-U2-O2-U2)
  9. the last pass goes down in a sequence of under-over two-under two-over two-under two (U1-O2-U2-O2-U2)

This completes the herringbone knot.

Since a runlist may be hard to follow for many, use the video tutorial below!


The post How to tie the herringbone knot appeared first on Paracord guild.

Spanish hitching

$
0
0

In this tutorial I demonstrate Spanish hitching.

Spanish hitching is a spiral like wrapping technique. I have seen it used on walking sticks and rowing paddles, but it has many applications besides those. I learned this technique for Bruce Grant’s Encyclopedia of rawhide and leather braiding.

Hitching can be done in a wide range of colors. The spiraling effect achieved is quite eye pleasing and I have rarely seen it used.

Click the images below for an up close look at Spanish hitching.

spanish-hitching-wrapspanish-hitching-paracord

Spanish hitching tutorial

So, how is this style of hitching actually done?

First we cut a number of strands for the actual hitching. These strands should cover the entire circumference of the object we are wrapping.

Another, longer strand is cut, which will spiral around the object we are wrapping. We will line up our hitches onto this longer cord.

In my case, I gutted (removed the inner strands) my paracord. I find it to lay nicer if it is flatter. With the cords prepared we then start the wrap:

spanish hitching (1 of 13)

Firstly we secure our working ends with a constrictor knot. I usually tie the constrictor knot using the long strand that will spiral around.

spanish hitching (2 of 13)

I then slide under the constrictor knot the working cords.

spanish hitching (3 of 13)

Once we have secured the cords, we take our longer strand and wrap it under our working cords.

spanish hitching (4 of 13)

We then line up a row of hitches with our working ends. W start on the left.

spanish hitching (5 of 13)

Then continue to the right.

spanish hitching (6 of 13)

One cord after the other.

spanish hitching (7 of 13)

Until we have a row of hitches (the exact number of hitches does not matter).

spanish hitching (8 of 13)

Then tighten up the long cord.

spanish hitching (9 of 13)

Finally, we tighten the hitches, one by one.

spanish hitching (12 of 13)

Start another row again wrapping the long cord under the working cords.

spanish hitching (13 of 13)

Then line up another row of hitches and continue the same way we did before.

Although I demonstrated the technique in many steps, it has been done so for clarity. The actual hitching is done very fast and intuitively and after a few rows you will have a feel for it.

A video of the technique can also be helpful in learning it:


The post Spanish hitching appeared first on Paracord guild.

Splicing in more paracord when you run out

$
0
0

In this tutorial we will take a look at how to splice in more paracord.

Splicing has multiple meanings in braiding. In this article I am referring to splicing as the method we use to join two ends of paracord when you run out of cordage and you need more for your braiding. This method is therefore used when you have your working cord in the project and need to attach more cord.

For standard joining of paracord, see the tutorial on the Manny method. The technique shown below is a variation of the Manny method and was demonstrated by Bruce Grant in his book, Encyclopedia of rawhide and leather braiding as a means of joining cords when you need more length.

The tutorial

We will need a couple of supplies. A lacing needle and something we can use to pierce the cord (I use a sharp spike).

With those ready, we begin splicing the two cords together:

splicing-paracord-(1-of-9)

Attach a lacing needle to the cord that you want to lengthen (the one coming out of your project.)

splicing-paracord-(2-of-9)

Pierce the end of the cord you are using to lengthen the cord.

splicing-paracord-(3-of-9)

Feed the lacing needle through the pierced end.

splicing-paracord-(4-of-9)

One end is now attached. Now for the other one.

splicing-paracord-(5-of-9)

Pierce the cord we pulled through (the one coming out of our project).

splicing-paracord-(6-of-9)

Attach the lacing needle to the cord we are attaching.

splicing-paracord-(7-of-9)

Feed it through the pierced end.

splicing-paracord-(8-of-9)

Once through, pull on the cords.

splicing-paracord-(9-of-9)

Done! Cord lengthened.

A video tutorial on the process is also available here:

The post Splicing in more paracord when you run out appeared first on Paracord guild.

Re-handling a knife

$
0
0

In this article I show you how I re-handled a knife with the use of paracord.

I have featured a bunch of knife handle wraps in the paracord projects section. But this time I used paracord to make an entire handle. I just wanted to share the result, since it is quite interesting, at least in my book. The previous handle on the knife fell apart, so it was a perfect chance to see how a handle made entirely of paracord would turn out.

The before and after images:

knife-no-handlerehandling-a-knife

For those wondering how this was done, the main part of the handle is done with Spanish hitching. The top and bottom are finished using a Spanish ring knot.

To start I recommend using a constrictor knot to hold the working ends (using the inner strands of paracord or sinew). I slid the working ends under this knot and then continued by making a Spanish ring knot.

Once that was completed, I used a cord coming out of the knot to line up the Spanish hitches. The end is again done using a constrictor knot, wrapping a little bit more and then covering the wrap using a Spanish ring knot.

knife-handle


See the video below to see the handle live:


I hope this quick look at making paracord knife handle was interesting to you, it does the job well and is quite decorative. When your knife handle falls apart, you can use paracord to repair it!


The post Re-handling a knife appeared first on Paracord guild.

How to make a paracord bottle wrap- half hitches

$
0
0

In this short tutorial I demonstrate how to make a half hitched paracord bottle wrap.

This was one of the first if not the first bottle wrap I ever did. It is very easy to do and has a nice looking, mesh/net like appearance. I used it on a baby bottle and it was the only one that did not break! Thank you paracord :).
This style of hitching can also produce a pouch by simply making it over a larger object, then removing it off the object wrapped.

The web/net look up close:

half-hitchesparacord-half-hitches

I have already used the same technique but without the spacing between the hitches to make a paracord lighter wrap. The principle is about the same.

Supplies needed

To make the wrap you will need the following:

paracord-bottle-holde-half-hitchedhitched-paracord-bottle-wrap

The tutorial

The following photo and video tutorial should be all you need to make the wrap. I will at this point also describe the process.

We start by attaching a smaller piece of paracord around the neck of the bottle. I used a cord lock to make the neck easier to close and open. I also finished the ends using celtic button knots.

I attached the working cord onto my lacing needle on one end, the other I attached to the neck cord. The hitches are then lined up onto the neck cord. Once one row is completed, we begin the second onto the first row.

You do not need to worry about tightening the hitches when working, you can do it at the end, by going through all the cord, from top to bottom. To determine the cord required I highly recommend you test a few rows then measure the cords. Depending on the spacing between hitches, as well as the circumference of the bottle, the cord length will wary quite a bit from bottle to bottle. Take some cord extra just in case. If you run out, you can use the splicing method to attach more cord.

When you reach the very bottom on the sides, make another row, but tighten it a bit more, so that the sides on the bottom get a nice shape. After that, switch to every other hitch (meaning make a hitch onto every other hitch in the previous row). This will quickly end the bottom.

You can finish with an overhand knot or any other way you prefer. See the photo and image tutorial below for more information.

Photo tutorial:

paracord bottle wrap tutorial

Video instructions:


Thank you for joining me in this easy project, enjoy your bottle wrap!

The post How to make a paracord bottle wrap- half hitches appeared first on Paracord guild.

Starting Australian flat braids

$
0
0

In this tutorial we will learn how to start an Australian style flat braid.

Australian flat braids, as pointed out by Bruce Grant in his Encyclopedia are very appropriate for making belts. Unlike the traditional start, where you would begin braiding at the buckle end, the Australian flat braids are started at the other, pointed end. This is a very easy beginning for a braid, a well as a very clean one. Ending braids started at the buckle is often a pain.

Below I demonstrate the start that can be used for any number of strands (usually an even number).

The tutorial

The set up is really simple. First determine the number of strands you need. Each cord will add two more strands to the braid. So for a 4 strand flat braid, you will need 2 cords, for 6, three and so on.

starting-australian-braids-(1-of-6)

Take one of the strands and make a loop with it.

starting-australian-braids-(2-of-6)

Add the second cord through the loop. Notice how the cords form an over-under sequence on both sides.

starting-australian-braids-(3-of-6)

For a six strand braid, another cord is added at the top. Notice that the sequence is always over-under on both sides.

From this you can extrapolate how easy you can add cords to make an 8, 10, 12 or higher number of strands to a braid.

For those that would like to see this in video form, a tutorial is also available:


How to braid from the start?

After you have your cords set up, you can simply transition into any braid you would like.

For example, a simple, 6 strand flat braid would be done so:

starting-australian-braids (4 of 6)

6 cords, set up with the method above.

starting-australian-braids (5 of 6)

The left cord moves under over to the right.

starting-australian-braids (6 of 6)

The right goes over, under, over to the left.

Then repeat the left again.

I have done a number of videos on braids, that start this way. Some you might find interesting are listed below. Make sure you find the pattern they are worked in, so you do not have to memorize all of the sequences.

How is such a braid finished?

So, you have braided a length. Now you want to attach a buckle. How is this done?

Traditionally, the braid is back-braided into itself. I will be making a video on this in the following days.

The post Starting Australian flat braids appeared first on Paracord guild.


6 strand crocodile ridge braid

$
0
0

In this tutorial we will take a look at the 6 strand crocodile ridge braid.

The name of the braid implies that the braid looks like the back of a crocodile. The braid has quite a specific look, with the center strands of the braid being raised. This look is appreciated by belt makers, but I can also see it being used on handles for dog leashes for example. I would assume from the name that the origin of the braid is Australian, but in any case, it is quite popular in the land down under.

Although I was quite intimidated by this braid when first starting it out, I have found a nice way of making it, that is easy to remember. Indeed, breaking this braid down into two parts, the setup process and the braiding process will help you get it down fast.

I learned the braid from Bruce Grant’s encyclopedia, but have modified it a bit for easier braiding.

crocodile-ridge-braid-6-strands

The tutorial

For this demonstration I have started the braid using an Australian flat braid start. This creates a nice starting point for the braid.

Setting up the braid

crocodile-ridge-braid-(1-of-11)

The Australian flat braid start. Any start can be used as long as you get 6 strands.

crocodile-ridge-braid-(2-of-11)

Take middle cord on the right (cord number 5) and place it over the bottom cord on the right.

You now have 4 cords on the left.

crocodile-ridge-braid-(3-of-11)

The third cord on the left (3) now crosses over the bottom cord on the left (4).

crocodile-ridge-braid-(4-of-11)

The second cord on the left now goes behind the two bottom cords (3 and 4).

crocodile-ridge-braid-(5-of-11)

Finally it passes back to the bottom on the left.

At this point we can start the braid.

Braiding the 6 strand crocodile ridge braid

The braiding starts at this point. It is a simple, two steps process of taking the top cord, placing it over the first cord, then wrapping around the bottom two cords and then finishing at the bottom of the same side. The other side is then worked.

crocodile-ridge-braid-(6-of-11)

We start on the top right, going over the first cord.

crocodile-ridge-braid-(7-of-11)

Wrap around the bottom two cords.

crocodile-ridge-braid-(8-of-11)

Finish on the bottom right.

crocodile-ridge-braid-(9-of-11)

The left side is now braided. We take the top cord and place it over the second cord.

crocodile-ridge-braid-(10-of-11)

Wrap around the bottom two cords.

crocodile-ridge-braid-(11-of-11)

Place the cord to the bottom on the left.

As you can see, the braiding of the crocodile ridge braid is not that hard at all. I hope it comes in handy in your projects.

For further information and a live tutorial, see the video below:


The post 6 strand crocodile ridge braid appeared first on Paracord guild.

8 strand crocodile ridge braid

$
0
0

In this tutorial, we take on the 8 strand version of the crocodile ridge braid.

I already did a tutorial on the 6 strand version of the crocodile ridge braid. This is a tutorial on using 8 strands. Usually I show two tutorial for each braid, so you can compare them and see the pattern, which can be applied to any other number of strands used. I have learned this braid from the Encyclopedia of rawhide and leather braiding.

I highly recommend first trying the 6 strand version. It may be a bit easier to start, not that either are too complicated.

crocodile-ridge-braid


Tutorial on the 8 strand crocodile ridge braid

I divided the tutorial in two parts to make it easier to follow. The first part sets up the braid, the second shows how the braiding is done. If you prefer video, one is available at the end of the photo tutorial.

The set up

I have set up the braid using a traditional Australian flat braid start. You may start the braid any way you like, as long as you have 8 strands to work with.

8-strand-crocodile-ridge-braid-(1-of-12)

8 strands, set up to be braided. Note that the bottom left and right cords are crossed.

If using any other start, you will need to cross the bottom two cords.

8-strand-crocodile-ridge-braid-(3-of-12)

To continue, we take the third cord from the left (counting from the top) and wrap it around the bottom left and right cord,

then return it to the bottom left.

8-strand-crocodile-ridge-braid-(4-of-12)

The third cord on the right is now wrapped around the bottom two cords and returned to the bottom right.

8-strand-crocodile-ridge-braid-(5-of-12)

The second cord on the left goes over the third cord.

8-strand-crocodile-ridge-braid-(6-of-12)

Then it wraps around the bottom two cords and returns to the bottom left.

8-strand-crocodile-ridge-braid-(7-of-12)

The second cord from the right now passes over the third cord.

8-strand-crocodile-ridge-braid-(8-of-12)

Then wraps around the bottom two cords and returns to the bottom on the right.

With that, the setup for braiding is complete.

The braiding sequence

Finally, we can begin demonstrating the actual braid. We will be alternating the top left and right cords from this point on and braiding them in the following sequence.

8-strand-crocodile-ridge-braid-(9-of-12)

With the top left cord, go under the second and over the third cord.

8-strand-crocodile-ridge-braid-(10-of-12)

Then wrap around the bottom two cords and return back to the left.

8-strand-crocodile-ridge-braid-(11-of-12)

With the top right cord, go under the second and over the third cord.

8-strand-crocodile-ridge-braid-(12-of-12)

Wrap around the bottom two cords and return to the right.

The braiding is not hard at all. The setup is where most lose their way. Do not let it deter you from experiencing this beautiful and unique braid.

See the video tutorial below for a live demonstration.


The post 8 strand crocodile ridge braid appeared first on Paracord guild.

11 strand flat braid- gaucho style

$
0
0

In this tutorial I demonstrate the 11 strand flat braid with a gaucho-like pattern.

The braid can be made with various, different colored strands, but as far as I have used it, I consider a two tone version to be the most appealing. The pattern for this braid is in my opinion ideal for making belts, but could also be integrated in dog collars. The pattern can be found in the Ashley book of knots under number 2986.

It indeed seems that odd number of cords used often has a beautiful pattern as the result.

11-strand-flat-braid

The tutorial

Braiding this braid is in fact very simple. It is made using 11 strands. In a two tone braid there would therefore be 6 cords of one color, 5 of the other.

The braid is then started on the side that has 6 strands. The top cord is passed under two, over three. The cord ends up on the bottom of the other side.

The other side now has 6 cords, so we take the top cord and again go under two, over three.

Not that difficult at all right?

See the images and video below for more information!

11-strand-flat-braid (1 of 5)

The cord, ready for braiding. 5 on the left, 6 on the right.

11-strand-flat-braid (2 of 5)

The top right cord passes under two, over three. It ends up on the bottom left.

11-strand-flat-braid (3 of 5)

The top left is not braided under two, over three and ends up on the bottom right.

11-strand-flat-braid (4 of 5)

Again the top right is braided. Under two, over three.

11-strand-flat-braid (5 of 5)

And the top left again. Under two, over three.

Not that hard at all, right? Make sure you work the braid tight to get a nice look. See the video tutorial below for a live demonstration.


The post 11 strand flat braid- gaucho style appeared first on Paracord guild.

Ringbolt hitching using cow hitches

$
0
0

In this tutorial I will show you how to decorate rings and buckles using the cow hitch.

I have covered various ringbolt hitching styles in the paracord knots section. But those we usually done as wraps to decorate handles.

Ringbolt hitching, as we can assume from the name was and is used to decorate rings though. Personally, I think that the technique shines when applied to belt buckles (see images below).

In this tutorial we are going to take a look at a fairly easy technique using cow hitches.

A couple of images of a ring, decorated with paracord:

cow-hitches-on-a-ringcow-hitches

As mentioned, I find hitching to be a great way to decorate belt buckles:

hitched-belt-bucklebuckle-covered-with-paracord

Making the hitches on the underside of the buckle also provides an eye pleasing effect:

belt-buckle-covered-with-paracordreverse-hitched-buckle

The tutorial

Hitching  with cow hitches is simple. We start with a larks head knot to attach the cord. Then we simply follow the technique demonstrated below. In essence it is two half hitches.

Cow hitches can then be lined up to the left or the right of the lark’s head knot. I demonstrate both below.

Tying the lark’s head knot.

right-cow-hitch-tutorial

Cow hitches going to the right of the lark’s head knot.

cow-hitch-left-tutorial

Cow hitches going to the left of the lark’s head knot.

I have also made a video on this simple technique:

There! I hope you enjoyed this tutorial and that it will help you make some beautiful creations!


The post Ringbolt hitching using cow hitches appeared first on Paracord guild.

Ringbolt hitching using the half hitch

$
0
0

In this brief tutorial I demonstrate the half hitch and how to apply it to rings.

As with the previous tutorial on ringbolt hitching, the purpose of this tutorial is to show you how to cover rings using paracord and other types of rope. This technique has many applications, myself, I like to decorate rings and buckles for belts.

The half hitching used in this tutorial is probably the simplest form of ringbolt hitching. Simple does not mean worse though, since I do like the end result.

half hitch projects

A few projects made with the half hitches. A steel ring, a paracord pendant and a belt buckle, all covered with paracord.

Belt buckles can also be covered quite nicely, a few images of the buckle I covered using 550 paracord can be seen below. Smaller cords can also work quite nicely.

half-hitched-buckleparacord-buckle-covering-half-hitch


So, let’s see how to use the half hitch to cover various objects!

The tutorial

As previously mentioned, this technique is easy. Below I demonstrate how to hitch to the right side (clockwise).

Note that the working cord goes behind the ring.

ringbolt-hitching-half-hitch-tutorial

If you wanted to hitch to left of the ring (counterclockwise), simply reverse directions.

Note that the working cord goes in front of the ring.
ringbolt-hitching-half-hitch (1 of 2)

ringbolt-hitching-half-hitch (2 of 2)

I also made a video that may prove useful:

The post Ringbolt hitching using the half hitch appeared first on Paracord guild.

How to make a paracord bracelet jig

$
0
0

In this tutorial I show you how to make a paracord jig, used for making bracelets, dog collars and even belts.

Many people consider the bracelet jig an essential tool. It is indeed very useful for making bracelets, because it not only holds it in place, but also provides a measuring system. As such it is a powerful tool for those crafters that want to make a lot of bracelets, with consistent results.

I highly recommend that you use the jig in combination with basic bracelet sizing theory, which will give you all you need to make bracelets.

While there are many jig designs out there, I selected this type of jig due to the tools you need. It can be done without power tools, or with, depending on what you have. Many supplies needed are also commonly found in the home.

paracord bracelet jig

With that said, let’s start with the first step: planning a paracord bracelet jig.

Planning our jig

There are a few aspects worth considering when making a jig. Since it is made by you, you can customize just about everything, from the wood used, to the very functionality of the jig.

If we focus on making a basic design, there are two aspects of the jig that we should consider:

  1. the width
  2. the length

Width

The wider the jig, the more different buckle sizes you can mount on it. This means that generally, a wider jig will have more buckle types you can use. A smart way to get around the width restriction is to have your middle and top part that have the buckles mounted interchangeable or able to rotate.

width-of-a-paracord-jig


Length

The length determines how, well long the items you make can be.

Usually, you should plan for 10-12 inches of working length for most bracelets. You can easily make a longer jig though, which can also enable you to tackle larger projects, such as making dog collars or even belts.length-of-a-paracord-bracelet-jig

Travelling

One more thing I would like to point out is that for those on the road a lot, you may want to design your jig to be fairly short, narrow and lightweight. Maybe even designed to be stored in a compact way by being able to disassemble it.

paracord jig

The working area of the jig.

Supplies

To make the jig you will need a number of supplies. Here I list the ones I would use. Any tool, equivalent in function can work just as well.

  • wood- you can reuse any wood you have lying around or buy it specifically for the project. All in all, you will need 2 longer pieces for the base of the bracelets, 5 smaller pieces, one for the sliding, middle part and two for the top and bottom each. I also used smaller, thinner pieces to make the sides to guide the middle part (seen below).
  • a saw- needed to cut the wood to size
  • sand paper- the unsung hero of the workshop enables you to smooth out the rough edges
  • glue- I recommend wood glue to hold your pieces in place while you insert the wood screws
  • wood screws- needed to hold the jig together. Smaller wood screws are also needed to attach the buckles to the top and middle parts of the jig.
  • a drill- either a power drill or a hand operated one, depending on what you feel comfortable working with. We will need it to pre-drill the holes for our screws to prevent the wood from splitting
  • a screw for the middle of the jig, used to secure it in place
  • two washers, for the top and bottom of the middle part
  • a wing nut, used to lock in the screw
  • a tape measure
  • a ruler and a marker
  • cable clamps (recommended)- for attaching the buckles
  • buckles- attached to the top and middle part of the jig
  • screwdriver
  • a protective coating and finish. I like to use raw linseed oil, since it is natural.
Supplies in image
Wood

Wood

Saw

Saw

Tape measure

Tape measure

Ruler and pen

Ruler and pen

Sand paper

Sand paper

jig-supplies-(4-of-11)

Drill

Wood glue

Wood glue

Wood screws

Wood screws

Large screw

Large screw

Washers

Washers

Wing nut

Wing nut

Building our jig

Listing the important aspects of a jig and the supplies needed is not enough to get the full picture. So, let’s see how a jig is made, step by step!

Step 1

The first step is cutting the wood and gluing the frame together. As previously mentioned, the working surface should be at least 10-12 inches long to allow you to make bracelets, more for collars and belts.

cutting-the-wood-for-the-jig

The jig is made with 7 parts of wood:

  1. two longer pieces for the base
  2. one piece for the middle, moving part
  3. four smaller pieces for the top and bottom of the jig

These pieces are then glued together:

making-a-paracord-jig-step (2 of 12)making-a-paracord-jig-step (1 of 12)

making-a-paracord-jig-step (3 of 12)You should make sure that you have sufficient room between the two main pieces, to allow the screw used on the middle part to move freely.

Step 2

We now need to mark and drill the holes at the top and bottom of the jig. These holes will guide the wood screws as well as prevent the wood from splitting. Use a hand or power drill.

Finally, longer wood screws are screwed in.

making-a-paracord-jig-step (4 of 12)making-a-paracord-jig-step (5 of 12)making-a-paracord-jig-step (6 of 12)

Step 3

After the screws have been inserted we can now attach the middle part. For this we need two washers, a wing nut and a long screw.

making-a-paracord-jig-step (7 of 12)making-a-paracord-jig-step (8 of 12) making-a-paracord-jig-step (9 of 12)

Step 4

We can now screw in our buckles to the top and middle part. If you have any cable clamps, those work great.

Pay attention to where you place your buckle, especially for the next step of marking the lengths. Some pieces of the buckle add to the length of the bracelet.

making-a-paracord-jig-step (11 of 12)

Step 5

Marking down the lengths can be very helpful. Make sure you also account for the buckle length.

You can use metric, inches or both.

making-a-paracord-jig-step (12 of 12)

Step 6- optional

Sanding the jig will provide a nice feel to the jig. Using linseed oil or any type of finish can give it a nice finishing look and protection.

As you can see from the images, I have also attached smaller pieces of wood for the sides of the jig to enable the middle part to slide more comfortably.

making-a-paracord-jig-step (10 of 12)

Note the top side of the jig has been reinforced with two thin pieces of wood, which guide the middle part on the way up and down.

In conclusion

The jig is now made and I hope that it will serve you well for making your bracelets.

A video on the process may also be helpful:

The post How to make a paracord bracelet jig appeared first on Paracord guild.

Vertical hitching aka rib cage hitching

$
0
0

A quick look at rib cage hitching.

I already used rib cage hitching in a tutorial on the paracord can coozie. Still, I think that also having a video tutorial on the technique would be helpful. I have featured it on the Youtube channel a while back, but have now finally had the time to put it where it belongs, on the site.

In any case, vertical or rib cage hitching is a variation of half hitching that results in quite a nice covering that can be utilized in a variety of scenarios. Personally I see it being most useful for making pouches, bottle wraps and holders.

I make it by first attaching a cord around the neck of an object I am covering (for example a bottle). I will line up a line of half hitches onto this cord, then switch to the rib cage hitching, which is made round the previous hitches (not between hitches like in half hitching). After gaining a length I like, I will pull out the slack, top to bottom.

The video tutorial on the technique:


The post Vertical hitching aka rib cage hitching appeared first on Paracord guild.


Slip on paracord bracelet

$
0
0

In this tutorial I demonstrate how to make a slip on paracord bracelet.

Some may enjoy the ease with which you can put these bracelets on and off, while others just like the look. This is a paracord bracelet without a buckle, which is easy to wear, plus you save up on supplies!slip on paracord bracelets

I am going to demonstrate the style that I make, which is made using the crown knot, You can naturally modify this tutorial and use any other braid or weave you would like on your slip on bracelet.

I find this project quite fun (I have tied three so far, it is quite addicting :)). I have also in the past used the crown knot to make a crown knot keychain, a tutorial which may come in handy if you are having trouble with the knot.

A few more images of these bracelets:

paracord-bracelet-without-buckleparacord-crown-knot-bracelets

So, let’s get started!

Supplies

You will need the following:

  • paracord 550, I used 4 pieces of gutted cord (inner strands removed). I recommend using 3.5-4 feet of cord for your first one
  • a piece of wire to hold the shape of your bracelet. Petra Ito, a fellow paracordist recommended cutting up old wire hangers. I used garden wire.
  • scissors and lighter
  • nose pliers or hemostat to tighten the ends with

With the supplies at the ready, Let’s move on to the tutorial.

crown-knot-paracord-braceletparacord-bangle


Slip on paracord bracelet tutorial

The bracelet is made in a few steps:

  1. first we tie a turk’s terminal knot or any other stopper knot using the 4 cords (you could also use a Matthew Walker knot or a double lanyard knot)
  2. we then make a crown knot
  3. into the first crown knot we insert our piece of wire and tighten the knot up
  4. we continue making crown knots, with the wire acting as the core, one on top of the next, until we reach the length of the bracelet that we would like. Tighten knots firmly
  5. finish with another turk’s head terminal or other stopper knots
  6. tighten the stopper knots by using nose pliers. Pull hard to really lock in the ends
  7. cut the excess cords on the ends
  8. bend the bracelet into shape.

Since not all know the crown knot, I whipped up a tutorial on tying it below:

crown knot tutorial

I feel that it is good to also see the bracelet being made, I also made a video on the entire tying process:

The post Slip on paracord bracelet appeared first on Paracord guild.

XOXO paracord bracelet

$
0
0

Let’s tie the XOXO paracord bracelet!

This bracelet is dear to me due to the exotic look as well as the message it brings. The XOXO part means hugs and kisses, which could be a nice present to a friend or loved one.

In essence, the XOXO bar bracelet is a variation of the cobra knot paracord bracelet.

I highly recommend tying it in two colors to bring out the “X” shape in the middle.

Now, let’s get to it!

xoxo-bar-paracord-braceletblue-xoxo-paracord-bracelet

Supplies

To make this bracelet you will need:

xoxo-paracord-braceletxoxo-bracelets


The XOXO paracord bracelet tutorial

The image tutorial, as well as video tutorial below should be enough for you to make this beautiful bracelet. In essence, it is made by tying a regular cobra knot bracelet, but also introducing a second color for the “X” shapes.  After tying the bracelet I recommend re-tightening it to get the best result. You can cut the ends and melt like you would in the regular cobra.

xoxo paracord bracelet tutorial

The video tutorial:

The post XOXO paracord bracelet appeared first on Paracord guild.

2 color conquistador braid

$
0
0

In this tutorial I demonstrate how to braid the 2 color conquistador braid.

The conquistador braid is a well known braid that has traditionally been used on belts. In the paracord community, the braid is also used to make great looking bracelets.

One of the ways you can use to spice up the already beautiful braid is to introduce a second color. This is a simple procedure, which I will describe below.

two color conquistador braid

With that said, let’s begin braiding!

Supplies

The supplies for making a 2 tone conquistador braid are basically the same as the single color version:

  • paracord 550 or any other type or rope or cord, in two colors
  • a buckle to attach the braid onto
  • a lacing needle. I recommend two if you have them, but it can be worked with one just fine as well. You can make a lacing needle using the lacing needle tutorial.

The 2 color conquistador braid tutorial

The photo and video tutorials below should be enough to braid this style of braid. There are basically three major steps in the braid:

  1. braiding a section with one color
  2. transitioning into the second color
  3. braiding the second section using a different color.

Let’s see how this is done.

Be sure to work the braid tightly for best looks.

Braiding the first section

The first section is made just like a regular conquistador would be. We basically attach the cord to the buckle, braid it up and down, by inserting the cord through the top of the loops.

Note that the cord passes behind itself when we are braiding up, and in front of itself when we go down.

conquistador-braid-tutorial

Introducing the second section

The second color is very simply introduced and the braid is continued in a different color, just like the first section.

2-color-conquistador-braid-tutorial

Transitioning into the other color

A big part of making this braid is to transition between colors. This is done by simply taking the color we are going to use and pass the end trough the very first loop of the other color.

Below are a few images of how this is done.

2-color-conquistador-braid-transition-tutorial

A video tutorial on the entire braiding process is also available:

In conclusion

I really find this braid to be very useful. When you make your first length, you may notice that the edges on one side do not look perfectly even. This is the back side, so this is not that problematic, but I wanted to point it out, to avoid any suspicion on the correctness of the braid. Thank you Rick Paracord for your help with this!

The post 2 color conquistador braid appeared first on Paracord guild.

2 color conquistador braid- “the Gemini”

$
0
0

In this tutorial we will take a look at a special variation of the 2 color conquistador braid.

Dubbed “the Gemini” and as far as I know, introduced by Nick Toong, this is a beautiful braid.

Unlike the 2 color version I showed yesterday, this one is divided horizontally, making it a really nice braid for making bracelets and belts. Made in two colors, you can really make a nice looking contrast, while still keeping the conquistador braid look.

Due to the way this braid is made, you will need non-even numbers of loops to make it. 3, 5, 7 and so on.

Before undertaking this braid, I highly recommend learning the basic conquistador braid (shown in the conquistador bracelet tutorial). This version is a bit more advanced and knowing the basic braid will make your work a lot easier.

2-color-conquistador-braid-the-gemini2-color-conquistador-braid-horizontal


Let’s see how to braid this unique braid!

The “Gemini” tutorial

The braid is made by rotating the top and bottom color to make it look like the braid is made with even parts, even though the loops used are not even. In a way, this connects the two colors/parts.

For this project you will need 2 colors of paracord, a lacing needle (or two) and a buckle.

The photo tutorial below should be all you need for the braid, if you prefer video though, it is also available, here.

Preparation

The first step is to prepare our cords and buckle for braiding. There are most likely many ways to start this braid. I have made my own, feel free to use this one, or come up with your own after you master the braid.

starting the braid

Braiding

The braid is done in two basic steps, just like the regular conquistador braid. In step one we travel from the bottom to the top of the braid, in step two we travel from top to bottom. Then step one is repeated.

Step one

In step one we take our bottom cord and make two loops with it (in my case when using 3 loops. For more, you would basically use one more loop for the bottom than the top). We then switch to the top cord and make another loop. Note that when going towards the top, the working end passes behind the working cord.

2-color-conquistador-braid-gemini-step-1

Step two

In step two we travel from the top to bottom. This time we make two loops (in this case) with the top cord and one with the bottom. Note that when travelling down, the cord end passes behind the working cord.

2-color-conquistador-braid-gemini-step-2

In conclusion

To continue, we would switch back to step one.

Make sure to braid the braid tight for best look.

To make things easier I also made a video tutorial, enjoy!


The post 2 color conquistador braid- “the Gemini” appeared first on Paracord guild.

Double core paracord bracelet

$
0
0

In this tutorial I will demonstrate how to set up a clean looking double core bracelet.

Using a double core is usually made to make a wider or flatter braid or weave. One problem you may encounter is that the start for a double core bracelet is not usually done in a way that would look all that nice. In this tutorial I will show you how to attach a cord to a buckle in a way that looks good.

The start is made using 4 cow hitches and a little trick to get everything to line up.

With that said, let’s attach our cord in a clean way!

The tutorial

We are going to attach the cord by forming 4 cow hitches.

Begin by opening our buckle (I am going to demonstrate on a jig for easier demonstration).

Fold the cord in half and secure this folded end by sliding it into the top part of the buckle. We are not going to work with it yet.

double core bracelet start


double core bracelet start 2

We then start tying our hitches. I have provided detailed images of tying all the cow hitches below:

Hitch number 1

This is the bottom left hitch.

double-core-paracord-bracelet-tutorial-1

Hitch number two

This is the bottom right hitch.

double-core-paracord-bracelet-tutorial-2

Hitch number 3

Top right hitch.

double-core-paracord-bracelet-tutorial-3

Hitch number 4

Top let and last hitch.

double-core-paracord-bracelet-tutorial-4

Finishing touches

Once you have tied this setup, you now have to remove the slack from it to get nice, tight cores to work with. Once that is done, you can try a variety of different double core projects. My favorite is the double core fishtail bracelet.

For those that prefer video, I have made one on this technique:

The post Double core paracord bracelet appeared first on Paracord guild.

Viewing all 149 articles
Browse latest View live